
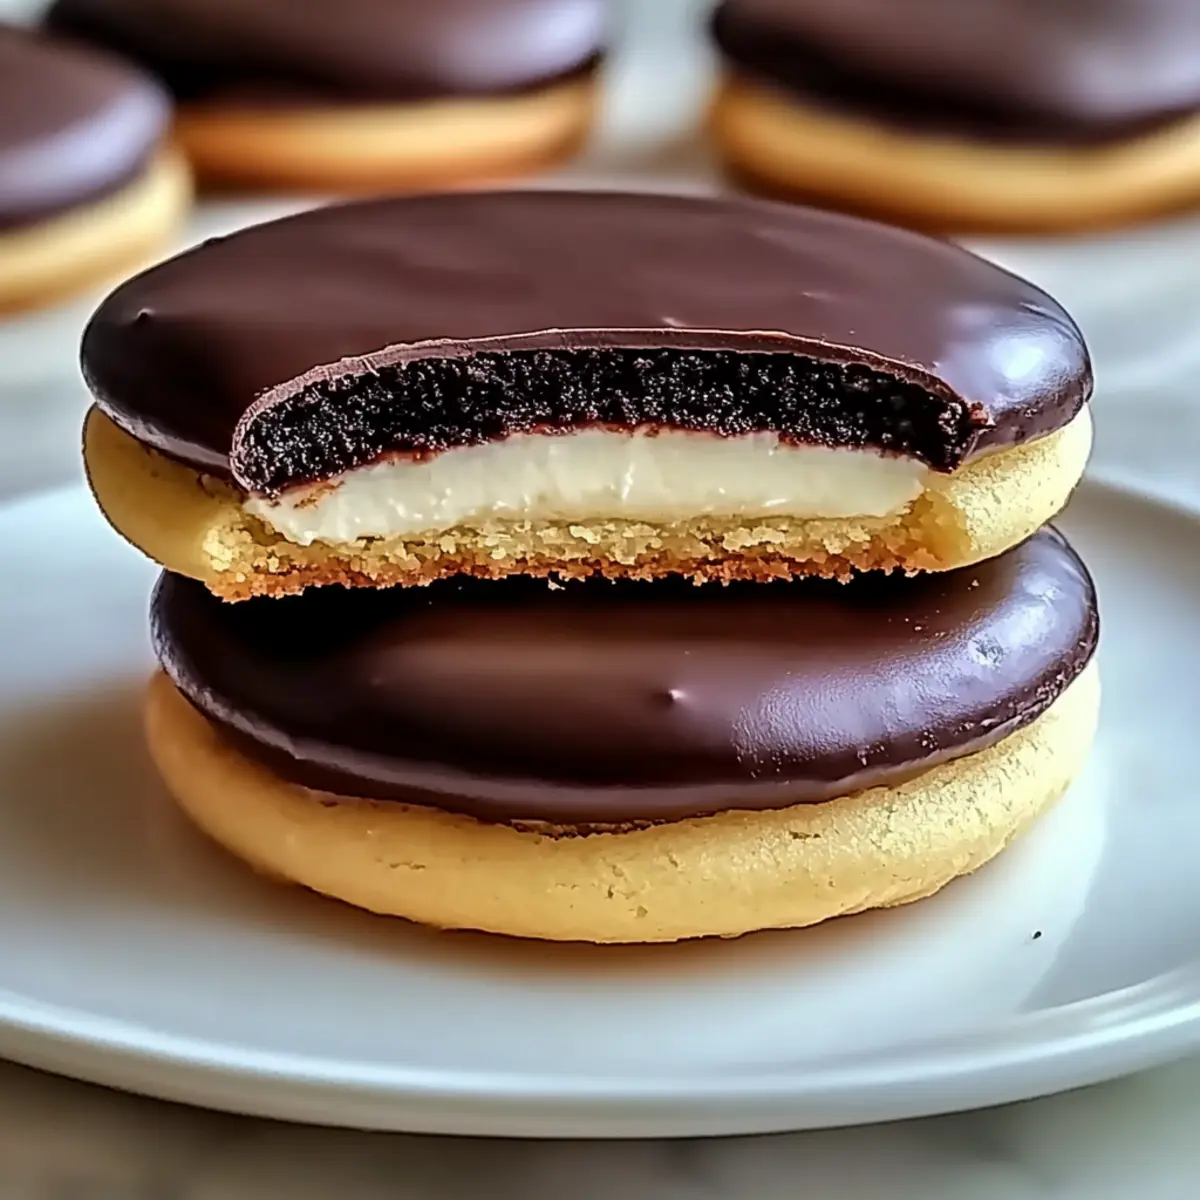
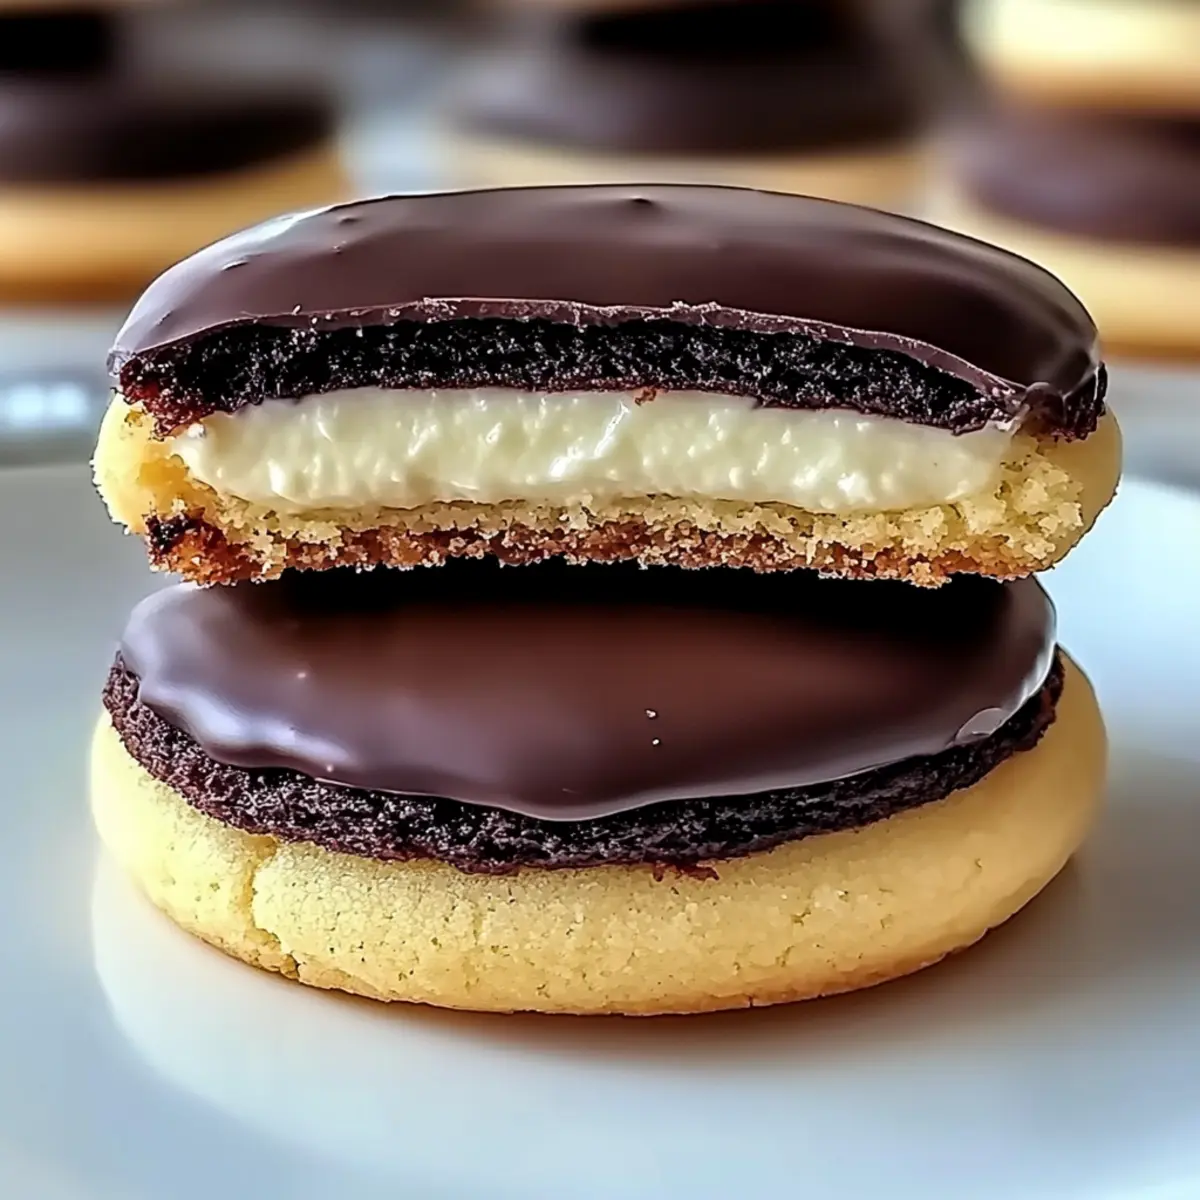
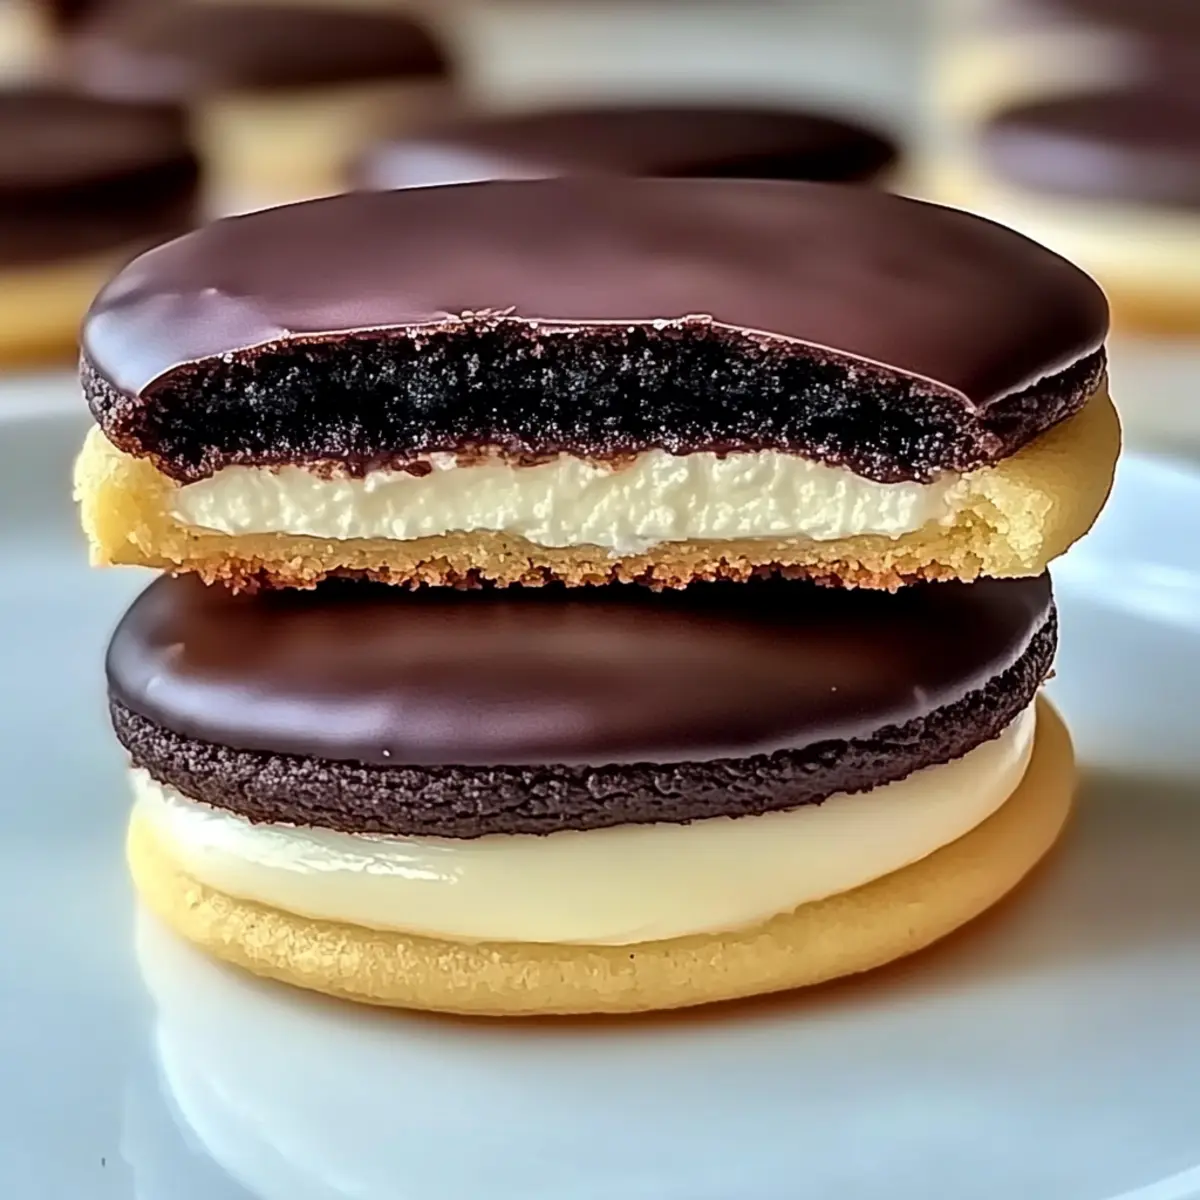
The smell of freshly baked cookies can transport you back to childhood memories and cozy kitchens. Today, I’m thrilled to share a delightful recipe that captures the essence of a classic dessert in an entirely new way: Boston Cream Pie Cookies. These bite-sized treats are not only quick to whip up but also an impressive crowd-pleaser, perfect for any gathering or sweet craving. Imagine soft, buttery cookies filled with a luscious cream and topped with a shiny chocolate glaze—what’s not to love? Plus, these cookies are incredibly customizable, allowing you to add your favorite flavors or toppings. So, are you ready to elevate your baking game and make something truly special? Let’s dive into the world of Boston Cream Pie Cookies!
Why Are Boston Cream Pie Cookies Irresistible?
Decadent Flavor: Each bite is a heavenly combination of rich cream and luscious chocolate, reminiscent of the classic Boston cream pie.
Quick and Easy: With straightforward steps and simple ingredients, you’ll have these cookies ready in no time.
Customizable Delight: Feel free to personalize the filling with flavored extracts like almond or zest, making them uniquely yours.
Crowd-Pleasing Treat: Perfect for sharing at parties or family gatherings, everyone will be reaching for seconds!
Pair these cookies with a side of fresh berries or a scoop of vanilla ice cream for an irresistible dessert experience!
Boston Cream Pie Cookies Ingredients
Get ready to whip up a delightful batch of Boston Cream Pie Cookies!
For the Cookies
- Unsalted Butter – Adds richness and helps create a tender cookie; make sure it’s softened for easy mixing.
- Granulated Sugar – Provides sweetness and enhances the cookie’s structure.
- Eggs – Acts as a binding agent; opt for large, organic eggs for the best flavor.
- Vanilla Extract – Enhances the flavor profile with a sweet aroma; you can swap it for almond extract for a unique twist.
- All-Purpose Flour – The main structure-building ingredient; substitute with gluten-free flour for a gluten-free option.
- Baking Powder – Helps the cookies rise; ensure it’s fresh for optimal results.
- Salt – Balances the sweetness and brings out the cookie’s flavors.
For the Cream Filling
- Heavy Cream – Whipped into soft peaks to create a rich, luscious filling.
- Powdered Sugar – Sweetens the cream filling and stabilizes the whipped cream.
For the Chocolate Glaze
- Semi-Sweet Chocolate Chips – Creates that glossy chocolate glaze; use dark chocolate for a deeper flavor.
- Unsalted Butter (for glaze) – Adds sheen and smoothness to the chocolate glaze.
With these simple ingredients, you’ll have everything you need to create your own batch of irresistible Boston Cream Pie Cookies!
Step‑by‑Step Instructions for Boston Cream Pie Cookies
Step 1: Preheat the Oven
Begin by preheating your oven to 350°F (175°C). While the oven heats up, prepare a baking sheet by lining it with parchment paper to prevent sticking. This ensures your Boston Cream Pie Cookies come out perfectly shaped and easy to transfer after baking.
Step 2: Cream Butter and Sugar
In a large mixing bowl, cream together 1 cup of softened unsalted butter and 1 cup of granulated sugar. Using an electric mixer, beat on medium speed for about 3-4 minutes until the mixture is light and fluffy. This step is crucial for incorporating air into the mixture, giving your cookies a tender texture.
Step 3: Incorporate Eggs and Vanilla
Add 2 large eggs, one at a time, to the creamed butter and sugar, mixing well after each addition. Next, blend in 1 teaspoon of vanilla extract until fully combined. The mixture should appear smooth and creamy, enhancing the flavor profile of your Boston Cream Pie Cookies.
Step 4: Combine Dry Ingredients
In a separate bowl, whisk together 2 cups of all-purpose flour, 2 teaspoons of baking powder, and ½ teaspoon of salt. This blend of dry ingredients helps to create the perfect structure for your cookies, ensuring they rise properly and maintain their shape while baking.
Step 5: Mix Ingredients
Gradually incorporate the dry ingredients into the wet ingredients, mixing on low-speed until just combined. Be careful not to over-mix the dough as this can lead to tougher cookies. Your dough should be soft and slightly sticky, ready to be scooped onto the baking sheet.
Step 6: Scoop Dough
Using a cookie scoop or two spoons, drop dollops of dough onto the prepared baking sheet, spacing them about 2 inches apart. You should aim for uniform sizes to ensure even baking. The cookies will spread slightly, so this spacing is important for optimal results.
Step 7: Bake
Place the baking sheet in the preheated oven and bake for 15-20 minutes, until the cookie edges are lightly golden. Keep an eye on your cookies, as they can over-bake quickly. Once done, remove them from the oven and let them cool on the baking sheet for a few minutes before transferring them to a wire rack.
Step 8: Prepare Cream Filling
While the cookies cool, prepare the rich cream filling by whipping 1 cup of heavy cream and ¼ cup of powdered sugar in a mixing bowl. Beat until soft peaks form, and the mixture is light and airy. This luscious filling will mimic the classic cream found in Boston cream pie.
Step 9: Fill Cookies
Once the cookies have completely cooled, pipe a generous amount of the whipped cream filling onto the flat side of half of the cookies. Gently sandwich them with the remaining cookies, pressing them down slightly to allow the filling to peek out around the edges.
Step 10: Make Chocolate Glaze
In a microwave-safe bowl, combine 1 cup of semi-sweet chocolate chips and 2 tablespoons of unsalted butter. Microwave in 30-second intervals, stirring in between, until melted and smooth. This glossy glaze will top your cookies, adding that essential touch of chocolate.
Step 11: Glaze Cookies
Dip the tops of the filled cookies into the warm chocolate glaze, allowing the excess to drip off. Place them on a wire rack to set completely. The glaze should create a beautiful shine over the Boston Cream Pie Cookies, promising a delightful bite each time.
Tips for the Best Boston Cream Pie Cookies
-
Perfect Butter Temperature: Ensure your unsalted butter is softened to room temperature; this will make creaming with sugar effortless and enhance the texture of your Boston Cream Pie Cookies.
-
Avoid Dough Over-Mixing: Mix the wet and dry ingredients until just combined. Over-mixing can lead to tough cookies, so be gentle!
-
Cooling Time Matters: Allow your cookies to cool completely before adding the cream filling. This prevents the filling from melting and ensures a delicious bite.
-
Accurate Flour Measurement: Measure flour correctly using the spoon-and-level technique to avoid dry cookies. Too much flour can lead to dense results.
-
Chill the Dough for Flavor: Refrigerating the dough for at least 30 minutes before baking enhances the flavors and makes handling the dough easier.
-
Customize Filling Flavors: Feel free to get creative with the cream filling! Adding flavored extracts or zest will take your Boston Cream Pie Cookies to the next level.
Storage Tips for Boston Cream Pie Cookies
Room Temperature: Store the cookies in an airtight container at room temperature for up to 3 days to maintain their softness and flavor.
Fridge: If you prefer a chilled treat, refrigerate the cookies for up to a week in an airtight container. This keeps the filling fresh and creamy.
Freezer: Unfilled cookies can be frozen for up to 2 months. Just ensure they are wrapped well in plastic wrap and stored in an airtight bag to prevent freezer burn.
Reheating: If stored in the fridge, enjoy these Boston Cream Pie Cookies at room temperature. For a warm treat, you can microwave them for about 10 seconds or until slightly warm.
Make Ahead Options
Making Boston Cream Pie Cookies ahead of time is a fantastic way to save time on busy days! You can prepare the cookie dough and refrigerate it for up to 24 hours. Just scoop the dough onto your baking sheet and cover it tightly with plastic wrap before chilling. Additionally, you can whip the cream filling and store it in an airtight container in the fridge for up to 3 days—just give it a gentle mix before filling the cookies. When ready to serve, bake the cookies from refrigerated dough and fill them with the cream once cool. This way, you’ll enjoy fresh, delicious cookies with minimal effort!
What to Serve with Boston Cream Pie Cookies
Enhance your dessert experience with delightful pairings that complement the sweet richness of these cookies.
-
Fresh Berries: The tartness of strawberries or raspberries balances the sweetness, adding a refreshing touch to your dessert plate.
-
Vanilla Ice Cream: A scoop of creamy vanilla ice cream melts beautifully over the top, creating a delightful contrast to the soft cookie texture.
-
Espresso: The robust flavors of a freshly brewed espresso perfectly cut through the richness, providing a sophisticated touch to your dessert experience.
-
Chocolate Drizzle: Elevate the indulgence by drizzling extra melted chocolate over your cookies; it adds a stylish flair and extra chocolatey goodness.
-
Whipped Cream: A fluffed dollop alongside your cookies enhances the creamy element, echoing the cookie’s filling while adding an airy texture.
-
Mint Leaves: Garnish your dessert plate with fresh mint leaves for a pop of color and a refreshing herbal note that brightens each bite.
Combining any of these luscious options alongside your Boston Cream Pie Cookies transforms a simple treat into a delightful, memorable dessert experience!
Boston Cream Pie Cookies Variations & Substitutions
Feel free to explore and make these cookies your own with these delightful twists!
-
Dairy-Free: Substitute unsalted butter with coconut oil and use canned coconut cream for the filling for a creamy dairy-free option.
-
Gluten-Free: Swap all-purpose flour with a 1:1 gluten-free blend, ensuring everyone can enjoy these sweet treats.
-
Chocolate Lovers: Use dark chocolate chips for the glaze to create a richer chocolate flavor that deepens the overall taste of the cookies.
-
Flavor Boost: Add a tablespoon of espresso powder to the cookie dough to enhance the chocolate notes, giving them a delightful coffee kick.
-
Citrus Zest: Incorporate lemon or orange zest into the cream filling for a bright, refreshing twist that complements the sweet chocolate glaze beautifully.
-
Nutty Goodness: Fold in chopped nuts like walnuts or almonds into the cookie dough for an extra crunch, creating a delightful texture contrast.
-
Fun Toppings: Try drizzling white chocolate over the glazed cookies or sprinkling colored sprinkles for a whimsical and festive design that elevates the appearance.
-
Try Different Extracts: Experiment with flavored extracts like peppermint or hazelnut instead of vanilla for a unique taste experience in each bite!
Feel inspired to add your special touch to these Boston Cream Pie Cookies for your next gathering or a cozy treat at home! If you’re looking for more sweet inspirations, check out my recipes for Lemon Cream Cheese Bars and Chocolate Chip Cookies. Enjoy the journey of baking!

Boston Cream Pie Cookies Recipe FAQs
What type of butter should I use for the cookies?
Absolutely! I recommend using unsalted butter at room temperature for the best results. This helps create a tender, rich cookie. Make sure it’s softened properly; cold butter won’t blend well with the sugar, affecting the cookie’s texture.
How should I store my Boston Cream Pie Cookies?
You can store these cookies in an airtight container at room temperature for up to 3 days. If you’d like to keep them longer, refrigerate them for up to a week. This keeps the filling fresh while maintaining their softness. Just ensure the lid is tight to avoid them drying out!
Can I freeze the cookies?
Yes, unfilled cookies freeze beautifully for up to 2 months! To do this, wrap each cookie individually in plastic wrap and then place them in an airtight freezer bag. When you’re ready to enjoy them, simply thaw at room temperature, then fill and glaze them whenever you’re ready for a treat.
What should I do if my cookie dough is too sticky?
Very good question! If your dough feels overly sticky, it’s often due to measurement inconsistencies. Consider adding a bit more flour, one tablespoon at a time, while mixing until the dough is manageable. Another helpful tip is to chill the dough in the fridge for about 30 minutes, which can make it easier to work with and enhance the flavor.
Can I customize the filling for dietary preferences?
Definitely! If you’re looking for a dairy-free option, consider using coconut cream whipped with powdered sugar instead of heavy cream. This will give you that luscious texture while keeping things dairy-free. You can also make it vegan by using flax eggs and dairy-free chocolate. The more the merrier when it comes to exploring variations!
How can I prevent the filling from melting?
To keep your cream filling fluffy and prevent it from melting, ensure that your cookies are completely cooled before adding the filling. Additionally, you can make the filling right before you’re ready to use it, as whipping the heavy cream with powdered sugar creates a stable, airy texture that holds up well inside the cookies. Enjoy your baking adventure!
Decadent Boston Cream Pie Cookies That'll Delight Everyone
Ingredients
Equipment
Method
- Preheat your oven to 350°F (175°C) and prepare a baking sheet lined with parchment paper.
- Cream together 1 cup of softened unsalted butter and 1 cup of granulated sugar using an electric mixer for about 3-4 minutes.
- Incorporate 2 large eggs one at a time, and blend in 1 teaspoon of vanilla extract until smooth.
- Whisk together 2 cups of all-purpose flour, 2 teaspoons of baking powder, and ½ teaspoon of salt in a separate bowl.
- Gradually mix the dry ingredients into the wet ingredients until just combined.
- Scoop dollops of dough onto the prepared baking sheet, spacing them about 2 inches apart.
- Bake for 15-20 minutes until the edges are lightly golden. Let cool on the baking sheet.
- Whip 1 cup of heavy cream and ¼ cup of powdered sugar until soft peaks form.
- Pipe the cream filling onto half of the cooled cookies and sandwich them with the remaining cookies.
- Combine 1 cup of semi-sweet chocolate chips and 2 tablespoons of unsalted butter in a bowl, microwave until melted and smooth.
- Dip the tops of the filled cookies into the chocolate glaze and place on a wire rack to set.
Leave a Reply