
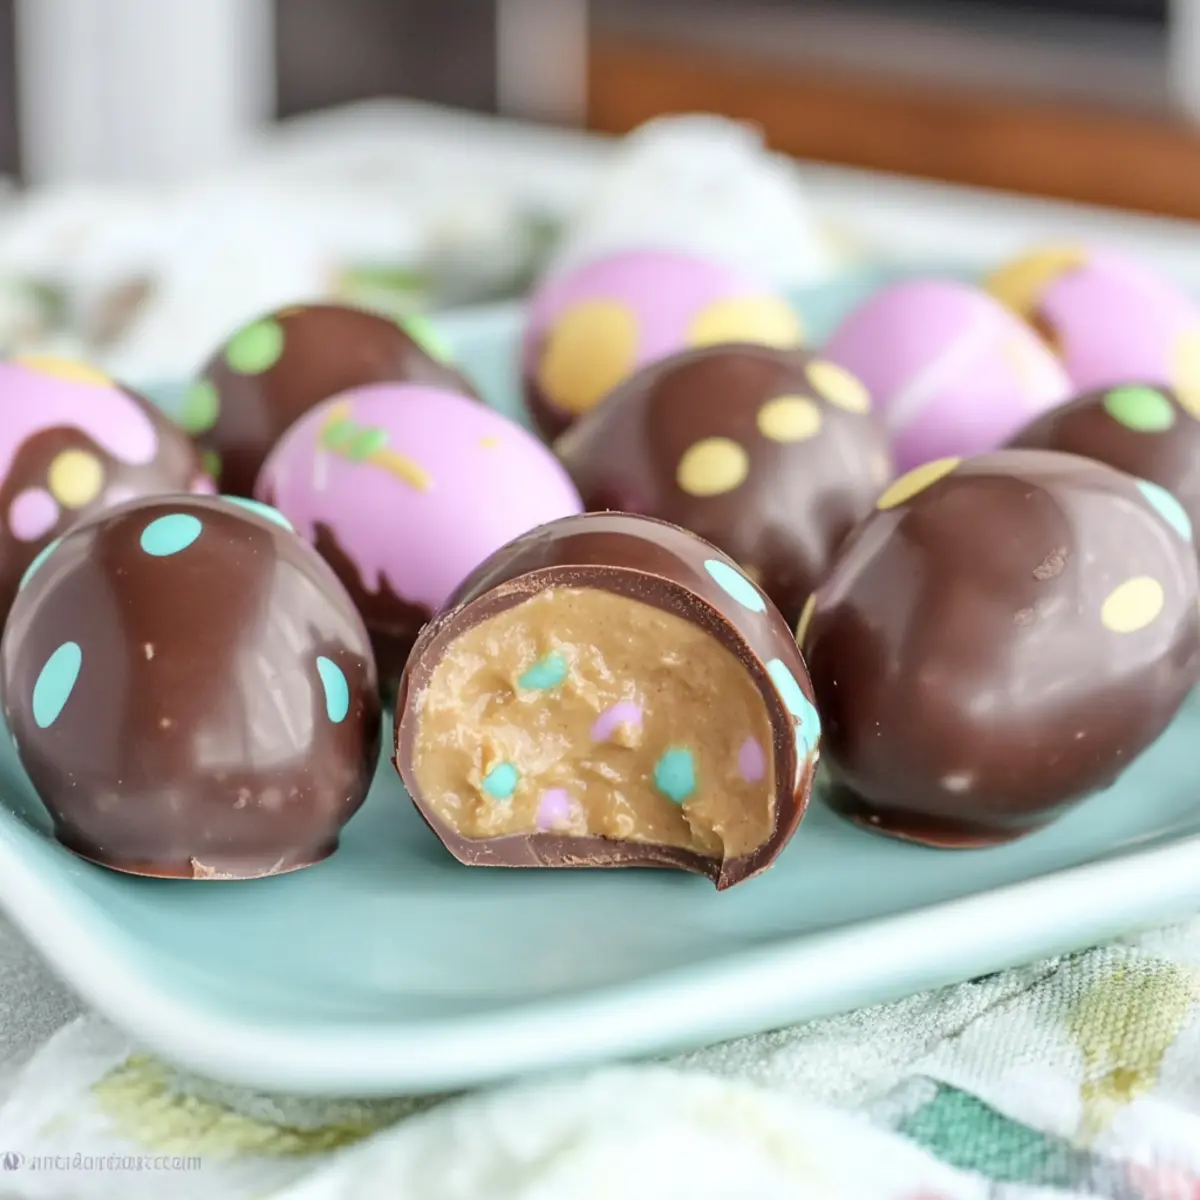
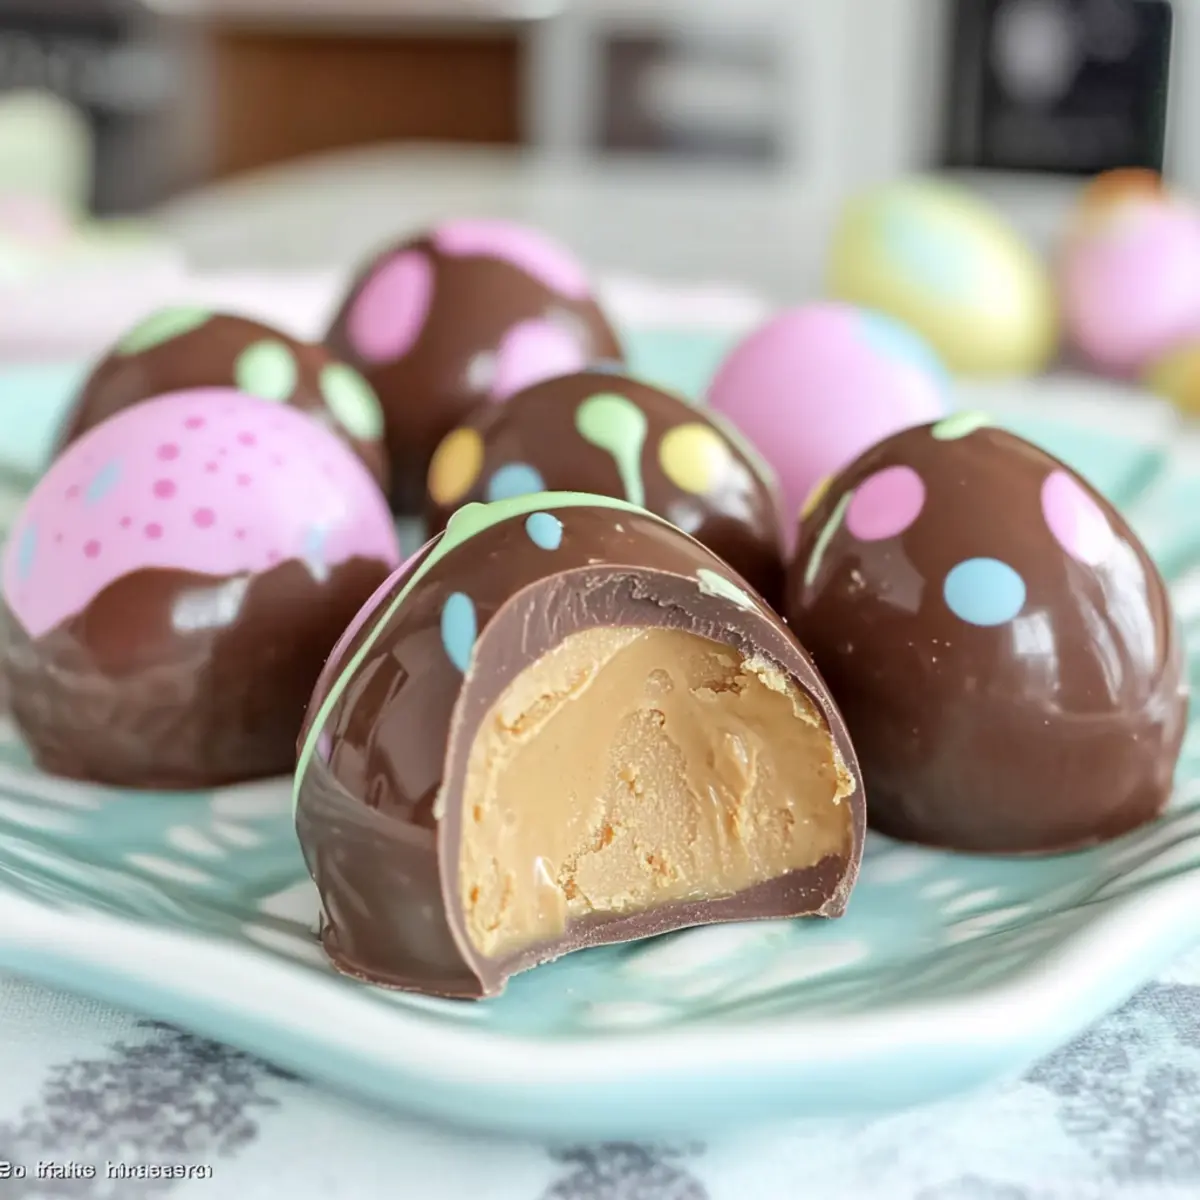
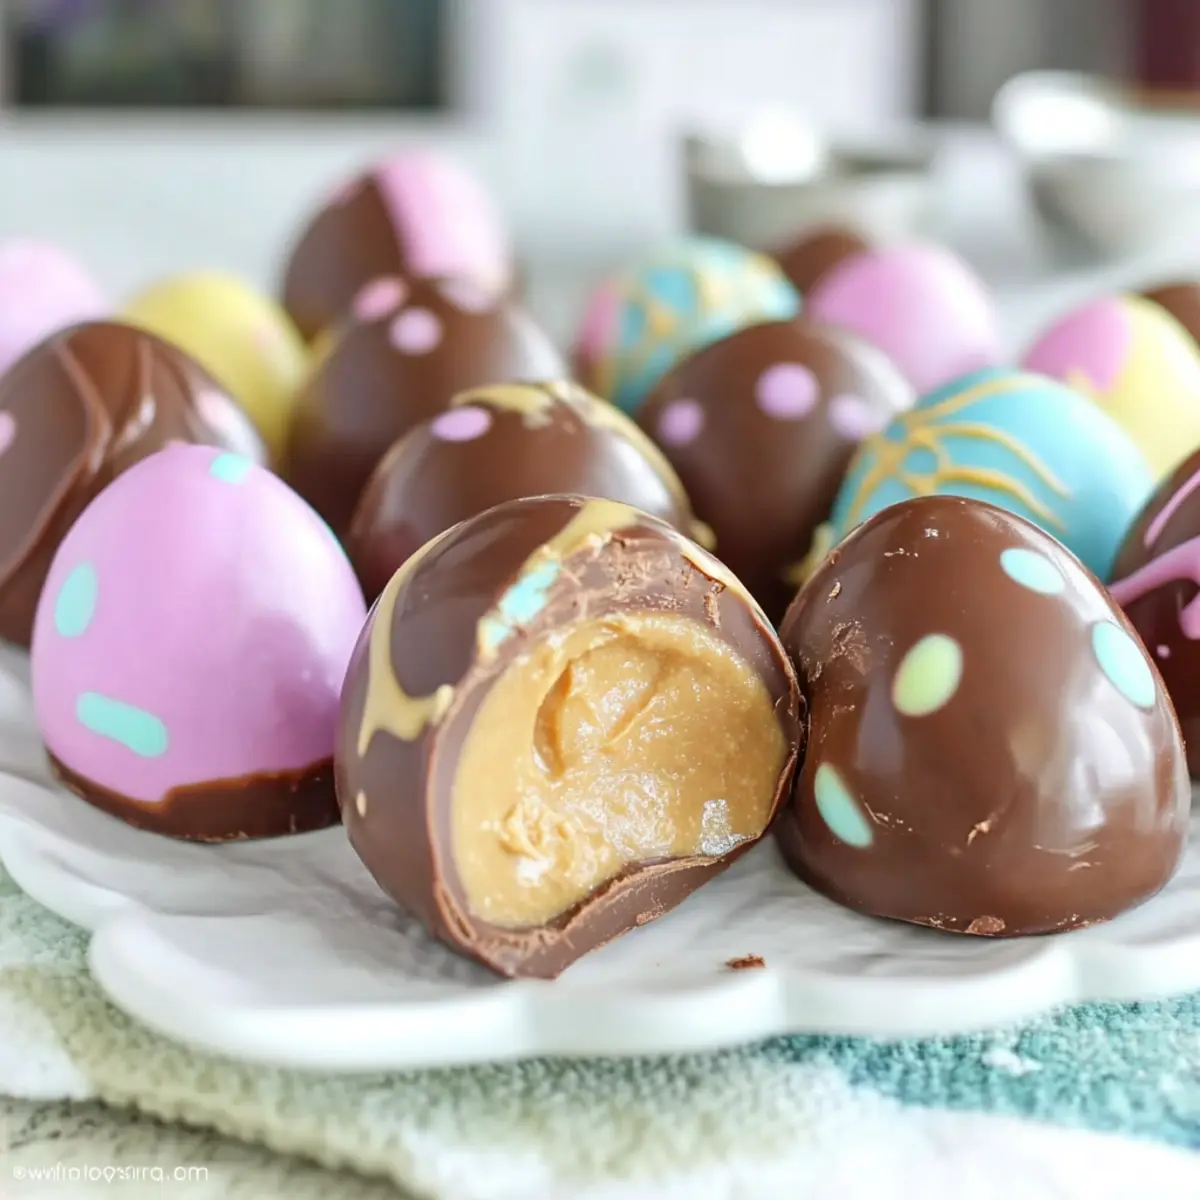
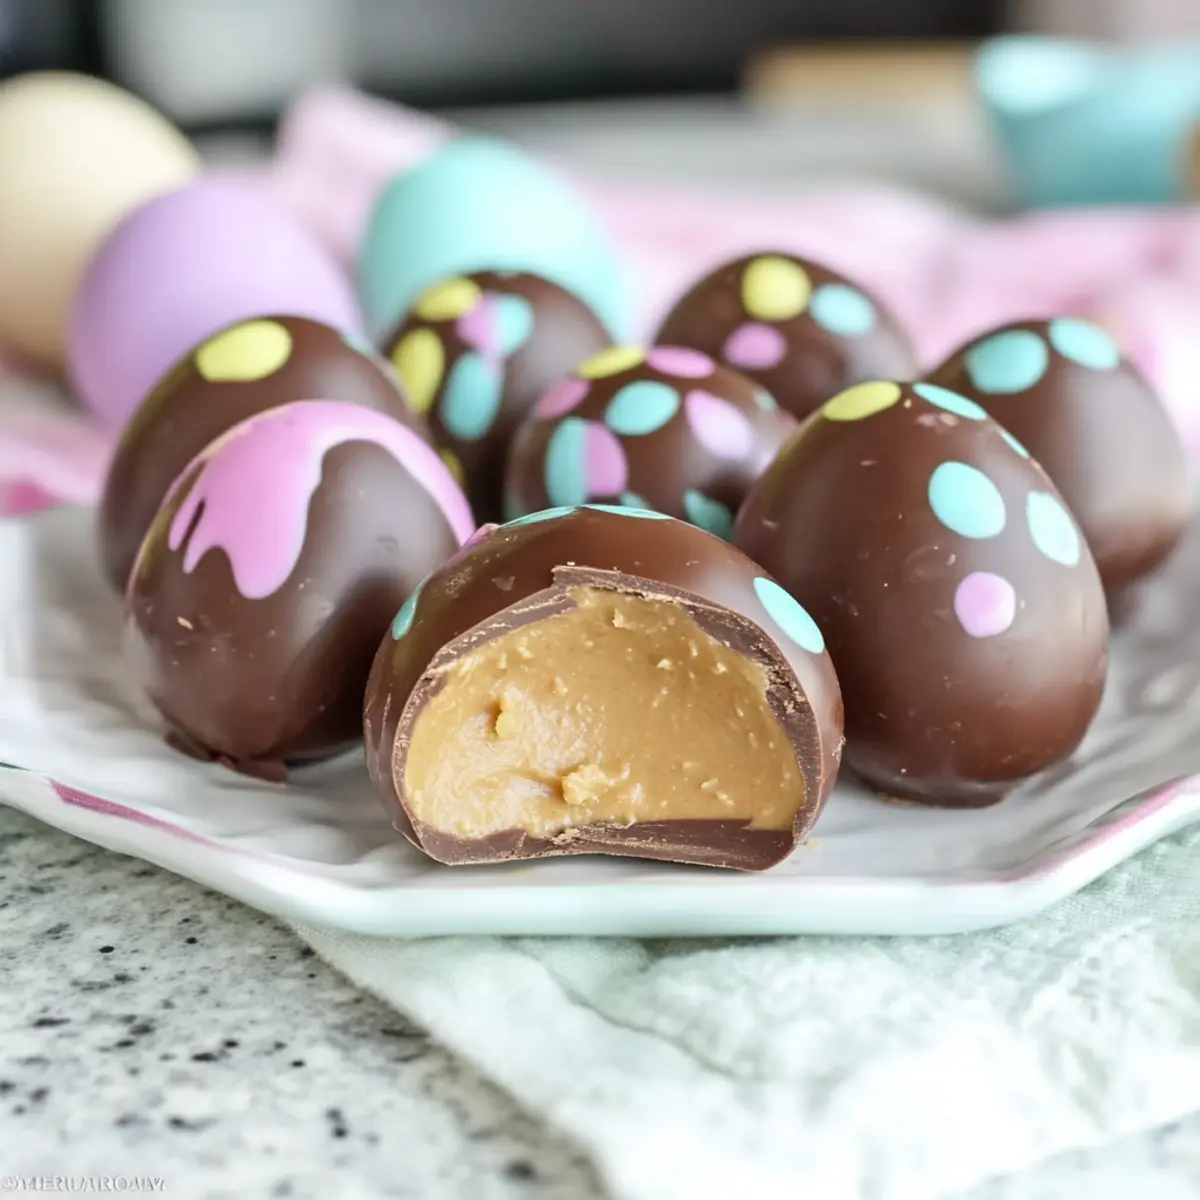
As I rummaged through my pantry, the familiar scent of peanut butter wafted through the air, instantly transporting me to my childhood kitchen where homemade treats awaited. This inspiration led me to create these irresistible Peanut Butter Easter Eggs, a delightful blend of creamy peanut butter and rich chocolate that’s perfect for celebrating the season. Not only are they a fun family project, but they’re also a healthier alternative to store-bought candy that everyone can enjoy. Imagine indulging in a sweet, salty, and slightly crumbly center, all wrapped up in a glossy chocolate shell, decorated in pastel hues that scream, “Easter!” Are you ready to make these festive delights and impress your loved ones? Let’s hop to it!
Why Are Homemade Peanut Butter Eggs a Must-Try?
Irresistible Flavor: The combination of creamy peanut butter and rich chocolate creates a mouthwatering treat that will satisfy your sweet cravings.
Fun Family Activity: These cute, decorative eggs are not only delicious but also perfect for involving kids in the kitchen, creating lasting memories while you whip them up together.
Healthier Choice: Skip the store-bought options and indulge in a homemade treat that you can customize based on your dietary needs—gluten-free and full of love!
Versatile Decorating: From pastel colors to creative designs, you can personalize each egg, making them a delightful addition to your Easter celebrations or as heartfelt gifts.
Once you’ve tasted the joy of making these Peanut Butter Easter Eggs, you might never go back to the pre-packaged versions! For more delicious homemade inspiration, don’t miss our Biscoff Cookie Butter or Spicy Garlic Butter recipes!
Peanut Butter Easter Eggs Ingredients
For the Filling
- Graham Crackers – Provides a slight crunch and structure for the filling. Substitution: Can use pre-crushed graham cracker crumbs (1/4 cup = 2 crackers).
- Smooth Peanut Butter – Main flavor component; contributes creaminess. Substitution: Natural nut butters can be used but may alter texture.
- Powdered Sugar – Adds sweetness and helps achieve the desired texture of the filling. Note: Granulated sugar will not work as effectively for this recipe.
- Vanilla Extract – Enhances the flavor profile of the filling. Substitution: Almond extract can be used for a different flavor.
- Unsalted Butter – Adds richness and helps bind the filling ingredients. Note: Use salted butter if unsalted is unavailable but reduce added salt.
- Salt – Balances sweetness and enhances peanut butter flavor. Note: Omit if using salted butter.
For the Chocolate Coating
- Colored Candy Coating Melts – For decorations, provides visual appeal with pastel colors. Substitution: Use white chocolate or candy melts if desired.
- Chocolate Candy Coating Melts – Forms the outer shell; adds a rich chocolate flavor. Substitution: Dark chocolate can be used for a deeper flavor.
Creating homemade Peanut Butter Easter Eggs is the perfect blend of fun and flavor for your Easter celebrations!
Step‑by‑Step Instructions for Peanut Butter Easter Eggs
Step 1: Prepare the Filling
Start by crushing graham crackers in a plastic bag using a rolling pin until they resemble fine crumbs. In a mixing bowl, combine the crushed graham crackers, smooth peanut butter, powdered sugar, vanilla extract, unsalted butter, and a pinch of salt. Mix these ingredients with a hand mixer on medium speed for about 2-3 minutes until smooth and creamy. Once combined, refrigerate the mixture for at least 30 minutes to firm up, making it easier to shape later.
Step 2: Make the Chocolate Shells
While the filling chills, clean and dry your silicone egg molds thoroughly to ensure a smooth release. In a microwave-safe bowl, melt the colored candy coating melts in 30-second intervals, stirring between each, until completely smooth. Use a pastry brush or a small spoon to apply a thin layer of the melted candy coating to the insides of the molds. Add fun designs or details, then place the molds in the refrigerator for about 10-15 minutes until the coating hardens.
Step 3: Complete the Chocolate Coating
Next, melt the chocolate candy coating melts using the same method as before, microwaving in 30-second intervals while stirring until smooth. Once your colorful candy shells are set and hardened, paint a thick layer of the melted chocolate on top of the colored coating inside the molds. This helps form a strong outer shell. Return the molds to the refrigerator for an additional 10-15 minutes or until the chocolate is fully set.
Step 4: Assemble the Eggs
With the chocolate shells ready, it’s time to fill your Peanut Butter Easter Eggs! Remove the filling from the refrigerator and scoop out portions into each mold, pressing gently to avoid any air pockets. Leave a small gap at the top of each mold to allow for sealing. Once filled, pour any remaining melted chocolate over the peanut butter filling, smoothing it out to create an even top layer. Refrigerate the molds for another 10 minutes until the chocolate layer solidifies.
Step 5: Demold the Eggs
After the final layer has set, carefully invert the egg molds. Gently flex the molds and tap the edges to release the Peanut Butter Easter Eggs without breaking them. If necessary, use a small knife or toothpick to help loosen any stubborn edges. Once demolded, place the eggs on a serving plate or a wire rack to cool completely before decorating or serving. Enjoy your delightful homemade candy!
How to Store and Freeze Peanut Butter Easter Eggs
Room Temperature: Keep your Peanut Butter Easter Eggs in an airtight container at room temperature for up to 2 weeks. This will retain their soft and creamy texture.
Fridge: If you prefer a firmer texture, refrigerate the eggs for up to a month. Ensure they are well-wrapped to prevent moisture absorption and maintain their flavor.
Freezer: For longer storage, freeze the eggs in an airtight container for up to 3 months. Allow them to thaw in the fridge overnight before enjoying.
Reheating: There’s no need to reheat these delights; simply let them sit at room temperature for a few minutes before indulging for the best flavor and texture!
Make Ahead Options
These Homemade Peanut Butter Easter Eggs are perfect for meal prep and can save you valuable time during the busy holiday season! You can prepare the peanut butter filling and chocolate shells up to 24 hours in advance. Simply mix the filling and refrigerate it, then make the chocolate shells and let them cool before storing them in an airtight container in the fridge. To maintain quality, ensure that the filling stays well-sealed to prevent it from drying out. When you’re ready to complete your eggs, fill the shells with the peanut butter mixture and cover them with chocolate, allowing them to set for about 10 minutes in the refrigerator for delightful, homemade treats that will impress your family and friends!
Peanut Butter Easter Egg Variations
Feel free to get creative with these Peanut Butter Easter Eggs and make them uniquely yours!
-
Nut-Free: Substitute almond butter with sunflower seed butter to create a nut-free version. This keeps the joy of peanut butter alive without the allergens!
-
Different Sweeteners: Switch out powdered sugar for coconut sugar or maple syrup to create a less processed sweet treat. Just remember, this may slightly alter the texture.
-
Flavor Boost: Add a pinch of sea salt or a sprinkle of cinnamon to the filling for an exciting flavor enhancement. It’s a small tweak that elevates the taste profile in a big way!
-
Crunchy Twist: Fold in chopped nuts like pecans or slivered almonds into the peanut butter mixture for added texture and flavor. The surprise crunch will delight every bite!
-
Dairy-Free Delight: Use dairy-free milk chocolate or dark chocolate coating for an indulgent, dairy-free treat that everyone can enjoy. Your taste buds will never know the difference!
-
Chili Chocolate: For the adventurous, add a pinch of cayenne pepper to the chocolate coating to create a sweet heat. It’s a delightful surprise that intensifies the overall chocolate experience.
-
Decorate Differently: Experiment with different toppings like crushed pretzels or colorful sprinkles for a playful finish. Personalizing each egg makes it not only tasty but visually stunning too!
For even more inspiration, consider trying our delicious Homemade Butter Chicken recipe next time you’re in the mood for comfort food! Or whip up some delightful Garlic Butter Steak for your next gathering. Enjoy the journey of creating your perfect Peanut Butter Easter Eggs!
What to Serve with Homemade Peanut Butter Easter Eggs
Indulge in the delightful experience of pairing these sweet treats with complementary dishes that enhance your Easter celebration.
-
Creamy Mashed Potatoes: The buttery richness and smooth texture create a comforting contrast to the sweet peanut butter eggs. Pair them for a festive family gathering!
-
Fresh Fruit Salad: A vibrant mix of berries, melons, and citrus offers a refreshing burst of flavors, balancing the sweetness of the peanut butter treats beautifully.
-
Mini Carrot Cakes: These bite-sized desserts echo the Easter theme and provide a hint of spice that complements the richness of the chocolate coating perfectly.
-
Chilled Lemonade: The tartness of lemonade cuts through the sweetness and adds a zesty hint, making it a refreshing drink to enjoy alongside the eggs.
-
Chocolate Bark: For the ultimate chocolate lover, serving a variety of chocolate bark with nuts or dried fruit offers a delightful texture contrast.
-
Creamy Vanilla Ice Cream: A scoop of smooth vanilla ice cream transforms your treat into a show-stopping dessert, making each bite an indulgence to remember.
Expert Tips for Peanut Butter Easter Eggs
-
Use the Right Molds: Ensure your silicone egg molds are flexible and of good quality for easy demolding. Poor-quality molds may lead to broken eggs.
-
Chill Between Layers: Refrigerate the chocolate shell and filling layers until set to prevent them from mixing, ensuring your Peanut Butter Easter Eggs have a distinct and creamy center.
-
Mixing Technique: When mixing the filling, don’t overmix the peanut butter and sugar. Aim for a smooth texture without becoming too fluffy, which can make shaping difficult.
-
Decorate Wisely: If using colored candy melts for decoration, apply them with a brush for precision, as pouring can lead to messy results and blurred colors.
-
Storage Matters: Keep your finished Peanut Butter Easter Eggs stored in an airtight container at room temperature. Avoid refrigeration to maintain that perfect texture.
-
Customize Flavors: Feel free to experiment with your favorite nut butters or flavor extracts to craft unique versions of these Peanut Butter Easter Eggs!
Peanut Butter Easter Eggs Recipe FAQs
How do I select ripe ingredients for this recipe?
For the best results, choose smooth peanut butter that is fresh and free of any oil separation. Use graham crackers that are whole and intact without breaking or dark spots, ensuring they provide the perfect crunch.
What is the best way to store Peanut Butter Easter Eggs?
Store your Peanut Butter Easter Eggs in an airtight container at room temperature for up to 2 weeks. If you prefer a firmer texture, they can be kept in the refrigerator for up to a month. Just make sure they are well-wrapped to avoid moisture!
Can I freeze Peanut Butter Easter Eggs?
Absolutely! To freeze, place your Peanut Butter Easter Eggs in an airtight container, ensuring they are separated to prevent sticking. They can be frozen for up to 3 months. When you’re ready to enjoy them, simply move the eggs to the refrigerator to thaw overnight.
What if my chocolate coating doesn’t set properly?
If your chocolate coating is not setting, ensure that the molds and melted chocolate are both completely dry, as moisture can prevent proper hardening. Also, it may help to let the coating cool slightly before applying it to avoid melting the previous layers. If the coating feels too thin, consider adding more chocolate on top and refrigerating it again.
Are there any dietary considerations I should keep in mind?
Yes, if you’re making these Peanut Butter Easter Eggs for someone with allergies, ensure to avoid cross-contamination with allergens such as nuts or gluten. Additionally, if you’re considering alternatives, sunflower seed butter can work as a nut-free substitute. Always double-check ingredients on labels to cater to specific dietary needs!
Can I use alternative decorations for my Easter Eggs?
The more the merrier! You can swap the colored candy melts with white chocolate, or even dark chocolate for a different flavor. For decorations, edible glitter or mini chocolate chips can add a fun twist. Personalize each egg to match your festive spirit!
Homemade Peanut Butter Easter Eggs That Steal the Show
Ingredients
Equipment
Method
- Prepare the Filling: Crush graham crackers and mix with peanut butter, powdered sugar, vanilla extract, unsalted butter, and salt. Refrigerate for at least 30 minutes.
- Make the Chocolate Shells: Melt colored candy coating melts; apply a thin layer in silicone molds and refrigerate for about 10-15 minutes.
- Complete the Chocolate Coating: Melt chocolate candy coating melts and pour over colored shells in molds. Refrigerate until set.
- Assemble the Eggs: Fill chocolate shells with peanut butter mixture, pour remaining melted chocolate over the top, and refrigerate until firm.
- Demold the Eggs: Carefully flex molds to release eggs and place them on a plate to cool completely.
Leave a Reply