
As I stood in my kitchen, the aroma of vanilla wafting through the air and pastel colors dancing before my eyes, the excitement of spring celebrations began to bubble up inside me. This is when I turn to my beloved Easter Peep Cake, a delightful layered treat that not only brings a sprinkle of joy to any festive gathering but is also surprisingly easy to whip up! With its vibrant hues and creamy vanilla buttercream, this cake radiates cheerfulness, making it a favorite among guests of all ages. Not only does this cake serve as a stunning centerpiece, but it also prompts delightful conversations around the table, transforming any ordinary occasion into a memorable celebration. Are you ready to learn how to create this whimsical cake that will surely be the highlight of your Easter feast?
Why Is the Easter Peep Cake Special?
Vibrant Colors: This Easter Peep Cake bursts with vibrant pastel layers that capture the essence of spring, making it visually stunning at any gathering.
Fun Decoration: Topped with playful Bunny Peeps and colorful Easter M&M’s, it brings a whimsical touch that’s perfect for kids and adults alike.
Deliciously Simple: Don’t worry about complicated techniques! The recipe is straightforward, allowing you to create a fabulous centerpiece without stress.
Crowd-Pleasing Treat: Each slice reveals a delightful surprise of colors and creamy frosting, ensuring that your guests will be talking about this cake long after the celebration.
Perfect for Various Occasions: While it’s a fantastic addition to Easter brunch, it’s also wonderful for birthday parties or spring get-togethers, making it a versatile dessert choice.
For an added festive flair, consider pairing it with an Easter Cookie Cake or a cheerful Easter Trifle Dessert to impress your guests!
Easter Peep Cake Ingredients
For the Cake
• Unsalted Butter (1 cup, softened) – Provides richness and moisture; substitute with margarine for a dairy-free option.
• Granulated Sugar (2 cups) – Adds sweetness and structure; brown sugar can be used for a deeper flavor.
• Large Eggs (3, room temperature) – Binds ingredients and adds moisture; use egg substitutes if vegan.
• Buttermilk or Whole Milk (1 cup) – Contributes tenderness; for buttermilk, mix 1 tablespoon vinegar with milk and let sit for 5 minutes.
• Vanilla Extract (2 teaspoons) – Enhances flavor; no suitable substitute; use pure vanilla for best results.
• All-Purpose Flour (3 cups) – Provides structure to the cake; gluten-free flour can be used as an alternative if needed.
• Baking Powder (2 teaspoons) – Leavening agent that helps the cake rise.
• Baking Soda (1 teaspoon) – Reacts with acidic components (like buttermilk) to create lift.
• Salt (½ teaspoon) – Balances sweetness and enhances flavor.
• Gel Food Coloring (Pink, Yellow, Blue) – Provides vibrant color; gel is preferred over liquid for better results without thinning the batter.
For the Frosting
• Unsalted Butter (2 cups, softened) – Base for the creamy frosting.
• Powdered Sugar (8 cups) – Primary sweetener; gives frosting its smooth texture.
• Vanilla Extract (1 tablespoon, for frosting) – Adds flavor to frosting.
• Salt (½ teaspoon, for frosting) – Balances sweetness in the frosting.
• Heavy Cream (⅓ cup) – Creates a silky texture in the frosting.
For the Decoration
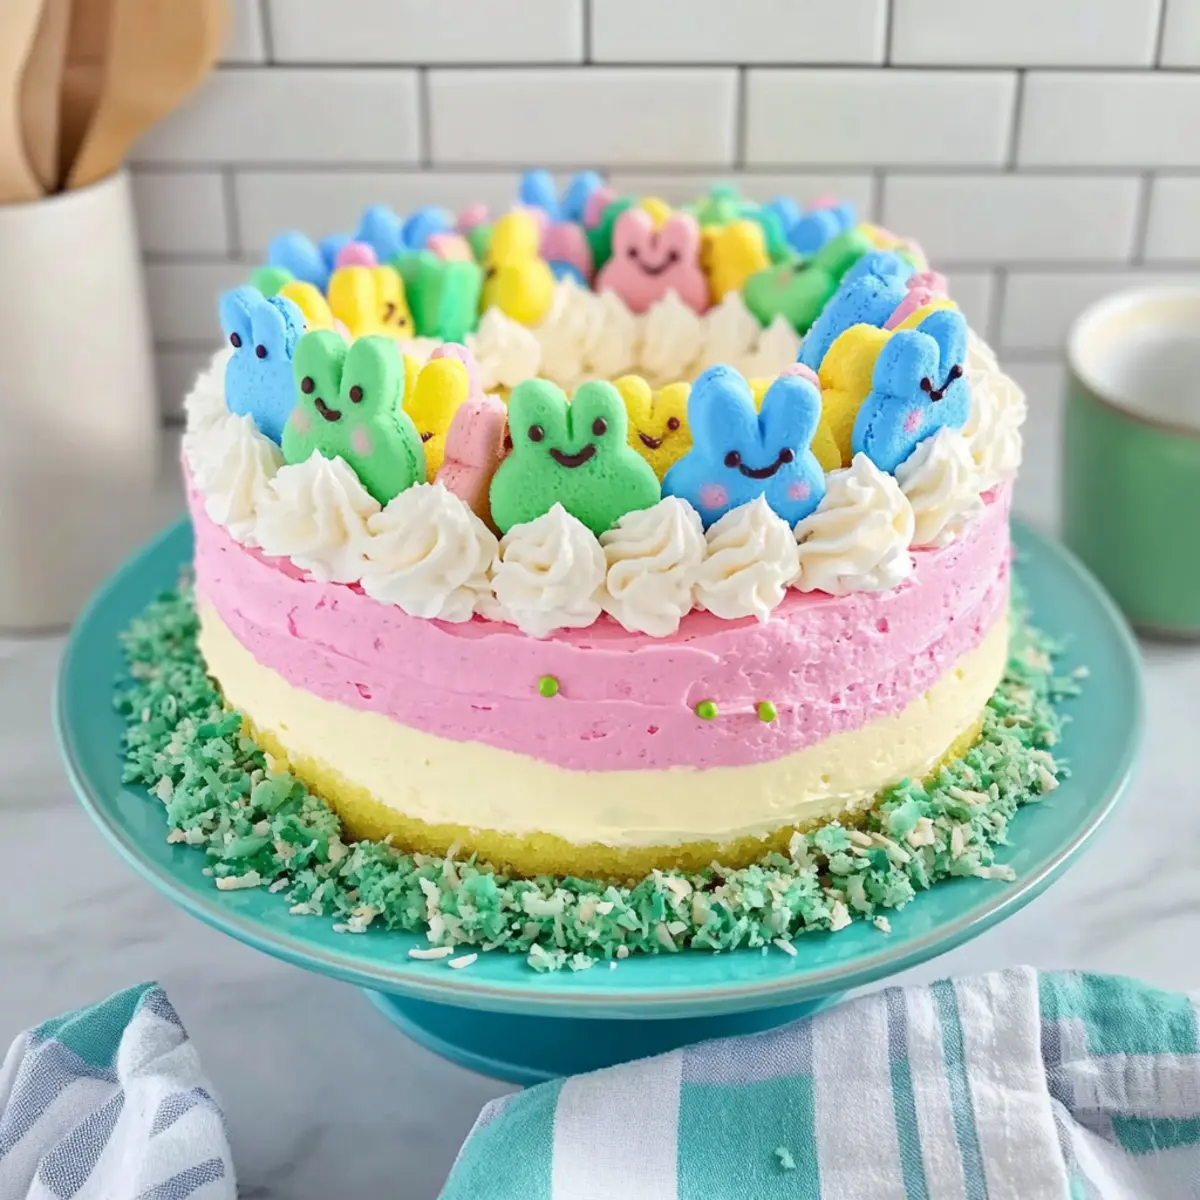
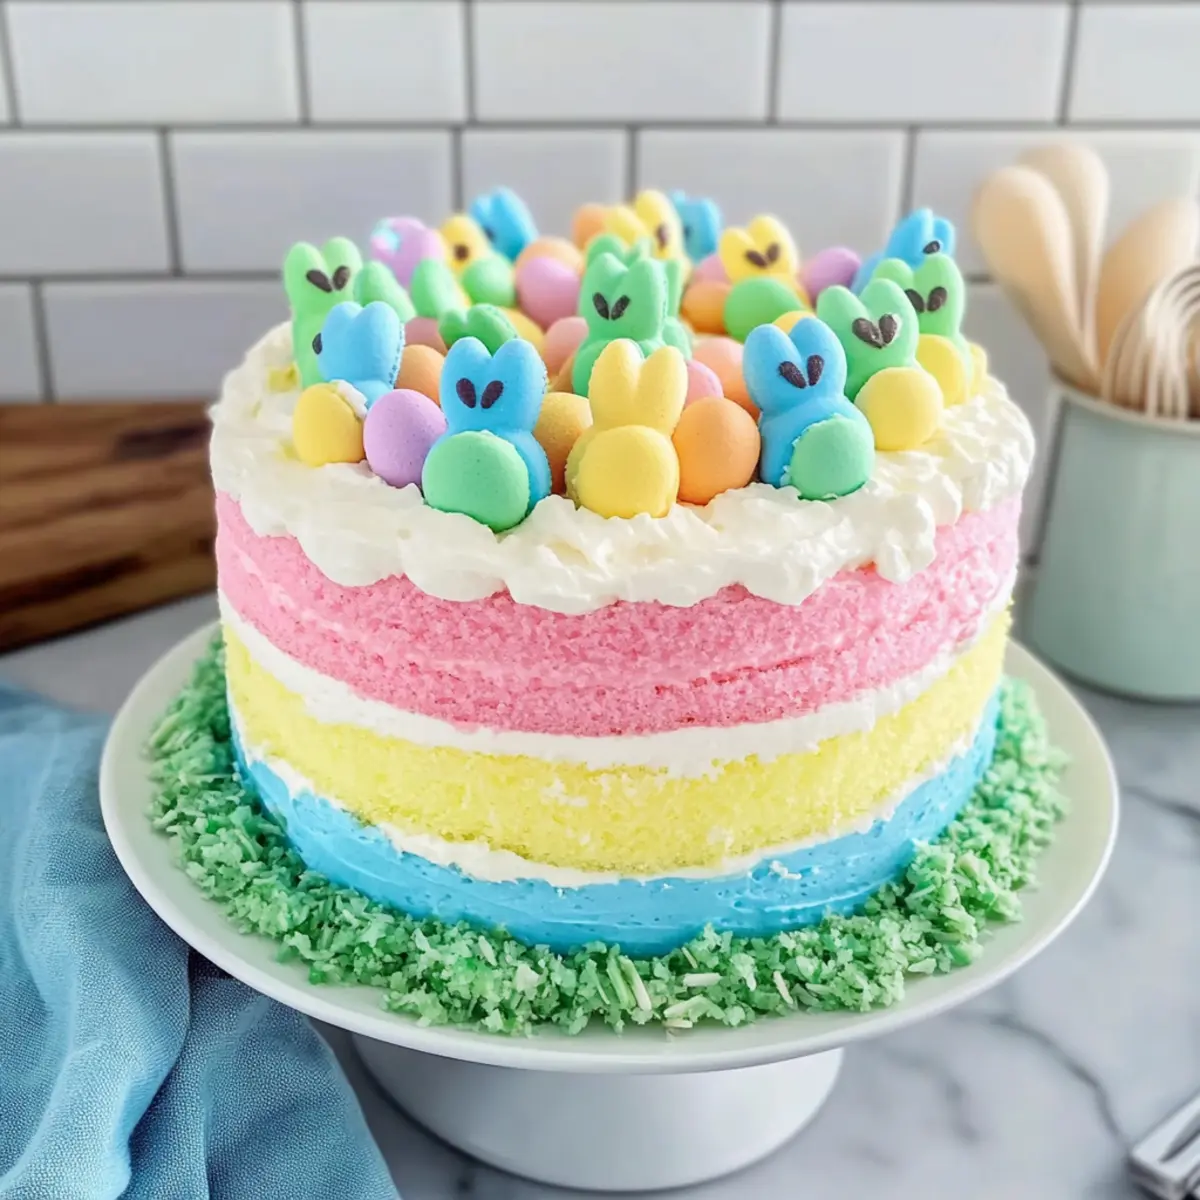
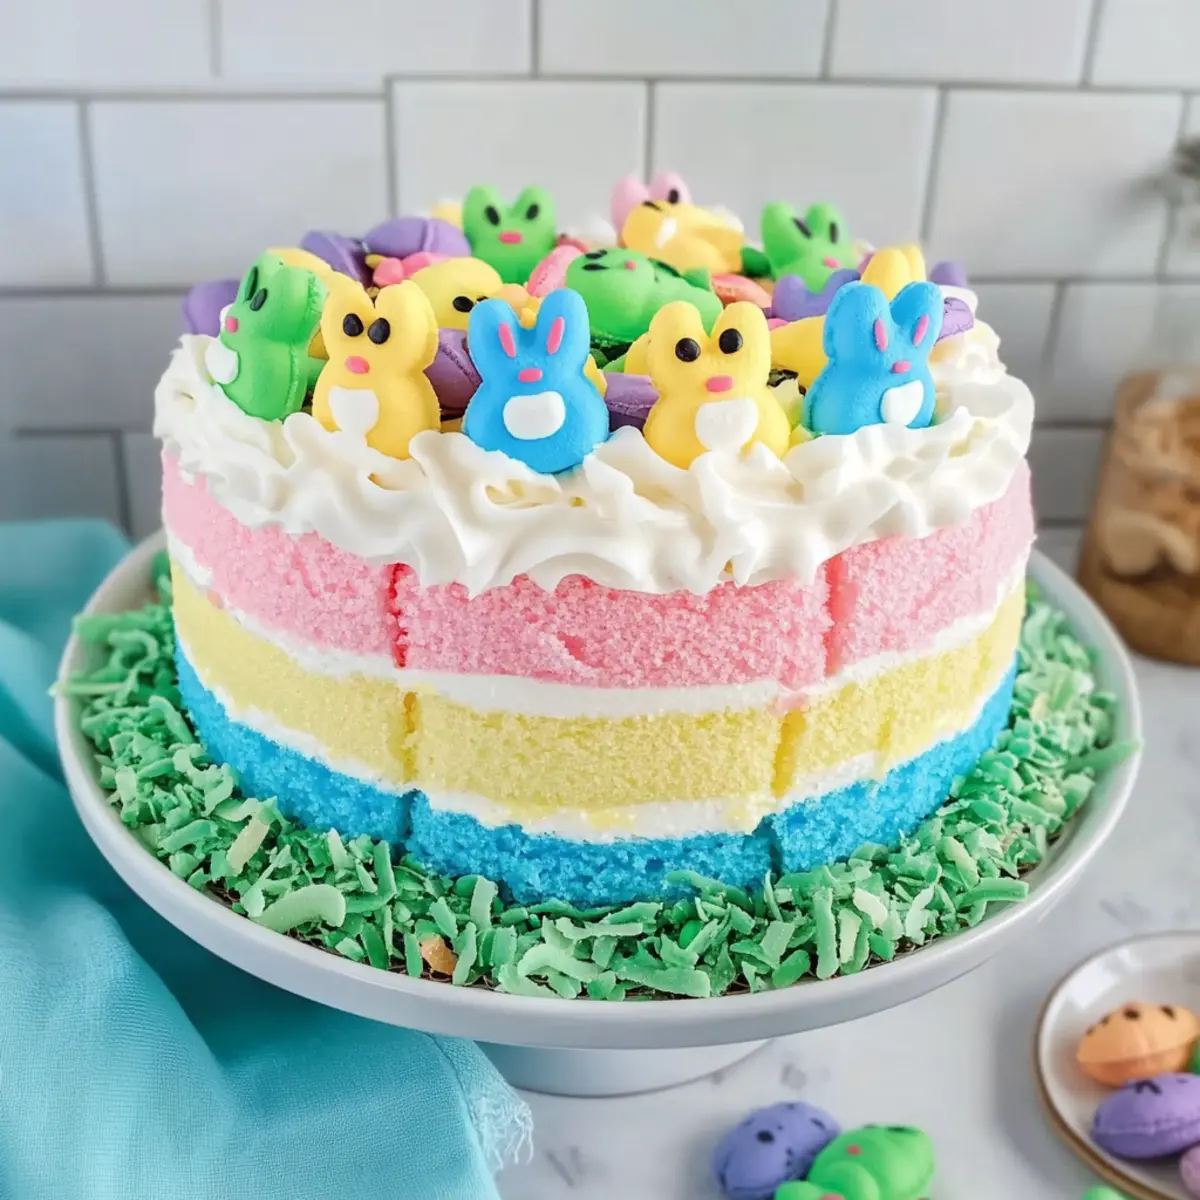
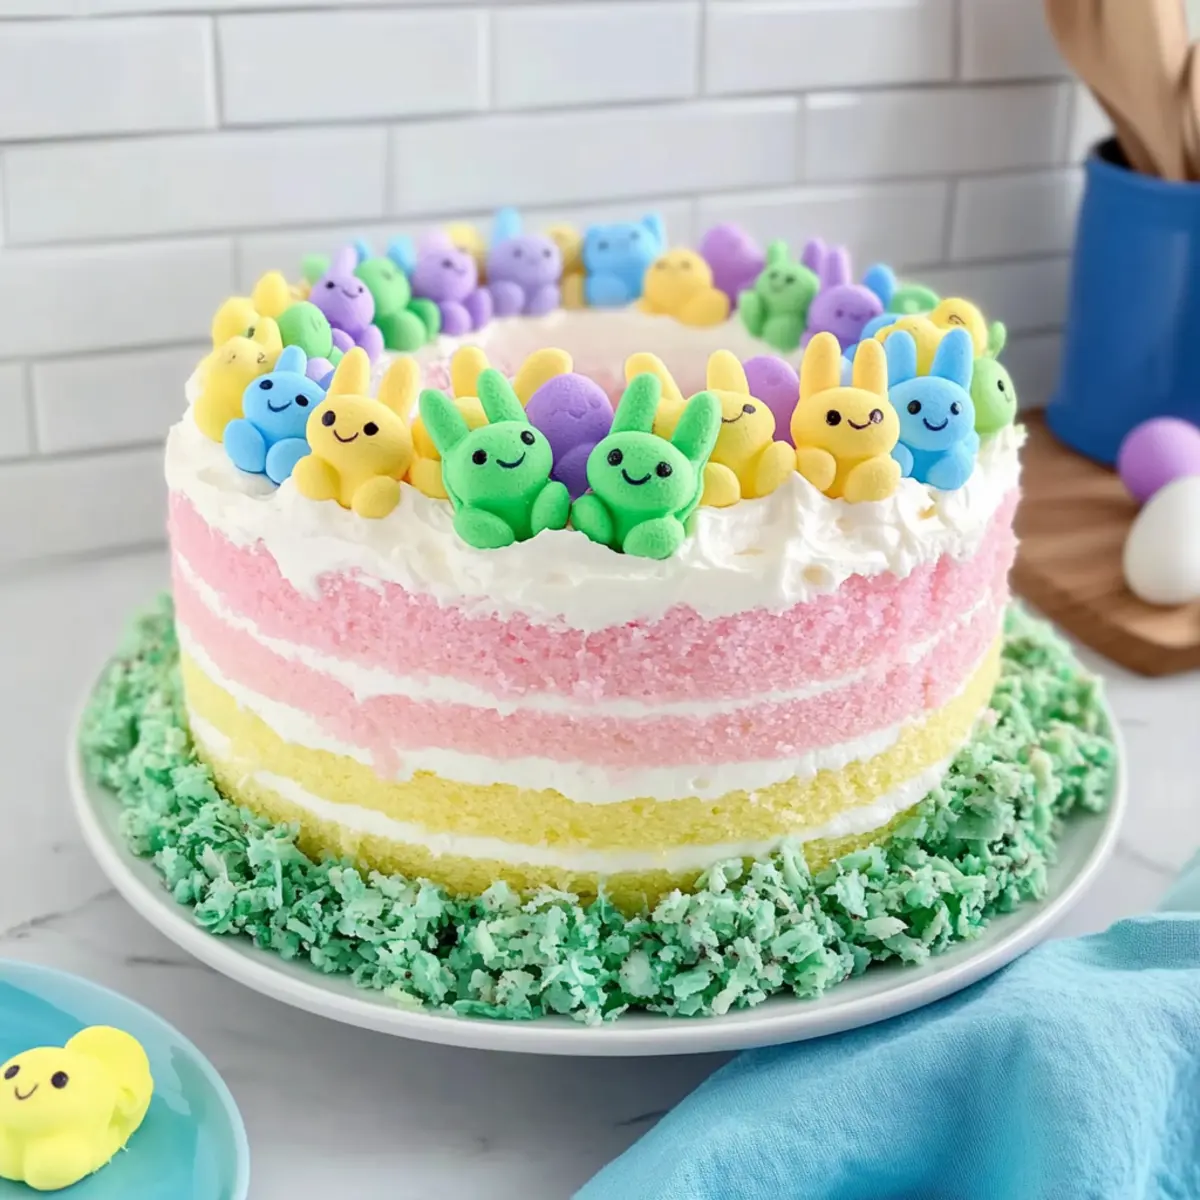
• Bunny Peeps (24) – Decorative element; should be added just before serving for freshness.
• Sweetened Coconut Flakes (1 cup, dyed green) – Used to mimic grass for decoration.
• Easter M&M’s Candies – Adds color and additional sweetness to the presentation.
This Easter Peep Cake will surely be the star of your spring celebrations!
Step‑by‑Step Instructions for Easter Peep Cake
Step 1: Prep Oven & Pans
Begin by preheating your oven to 350°F (180°C). While the oven warms up, grease and flour three 9-inch round cake pans to ensure easy release. For added security, line the bottoms of the pans with parchment paper. This preparation sets the stage for baking your delightful Easter Peep Cake.
Step 2: Make Batter
In a large mixing bowl, cream together 1 cup of softened unsalted butter and 2 cups of granulated sugar until the mixture is light and fluffy, about 3-5 minutes. Add 3 room-temperature eggs, one at a time, ensuring each is fully incorporated before adding the next. Mix in 2 teaspoons of vanilla extract to elevate the flavor profile of your cake.
Step 3: Combine Dry Ingredients
In a separate bowl, whisk together 3 cups of all-purpose flour, 2 teaspoons of baking powder, 1 teaspoon of baking soda, and ½ teaspoon of salt until well combined. This dry mixture will provide the necessary structure to your Easter Peep Cake and will ensure even distribution of leavening agents.
Step 4: Mix Wet & Dry Ingredients
Gradually add the dry ingredients to the creamed butter mixture, alternating with 1 cup of buttermilk or whole milk. Start and end with the dry ingredients, mixing until just combined. The batter should be smooth and slightly thick, creating a rich base for your cake layers.
Step 5: Color the Batter
Divide the smooth cake batter evenly into three separate bowls. Using gel food coloring, tint one bowl pink, another yellow, and the last one blue, mixing well until you achieve vibrant colors. This step is crucial for creating the visually appealing layers of your Easter Peep Cake.
Step 6: Bake Layers
Pour each colored batter into the prepared pans, spreading evenly. Bake in the preheated oven for 20-25 minutes, or until a toothpick inserted into the center comes out clean. Once done, let the layers cool in the pans for 10 minutes, then carefully transfer them to wire racks to cool completely.
Step 7: Prepare Frosting
In a large mixing bowl, beat 2 cups of softened unsalted butter until creamy. Gradually add 8 cups of powdered sugar, mixing well between additions. Once combined, add 1 tablespoon of vanilla extract, ½ teaspoon of salt, and ⅓ cup of heavy cream, and continue to mix until the frosting is light, fluffy, and easily spreadable.
Step 8: Assemble Cake
On a serving plate, place the blue colored cake layer as the base. Spread a generous amount of frosting on top, followed by the yellow layer. Repeat the process with another layer of frosting and top with the pink cake layer. Ensure each layer is aligned properly for a beautiful presentation.
Step 9: Crumb Coat
Apply a thin layer of frosting around the entire cake, known as a crumb coat. This step helps to seal in crumbs and prepare the cake for the final frosting layer. Place the cake in the refrigerator for about 15 minutes to let the crumb coat set.
Step 10: Final Frosting
Once the crumb coat has set, spread a thicker layer of frosting smoothly over the entire cake using an offset spatula or a bench scraper for a clean finish. This layer will ensure your Easter Peep Cake looks as delightful as it tastes.
Step 11: Decorate
Press the Bunny Peeps around the edges of the cake, placing them upright for a playful touch. Fill the top and any gaps around the Peeps with dyed green coconut flakes and scattered Easter M&M’s for added color and a festive touch. Your beautiful Easter Peep Cake is now ready to impress!
What to Serve with Easter Peep Cake
This vibrant layered delight shines brightly on any festive table, inviting you to create a wondrous meal around it.
-
Creamy Mashed Potatoes: The buttery smoothness of mashed potatoes balances the cake’s sweetness, offering a comforting side that contrasts beautifully.
-
Fresh Garden Salad: A light, crisp salad with fresh greens, cucumbers, and a tangy vinaigrette adds a refreshing touch to your celebration.
-
Grilled Vegetables: Seasonal vegetables like zucchini, bell peppers, and asparagus give a smoky flavor that pairs wonderfully with the cake’s sugary icing.
A selection of savory sides can enhance the cake’s festive spirit. Choose colors and textures that celebrate spring, tempting your guests to indulge in cheerful combinations.
-
Lemonade or Iced Tea: A chilled, refreshing drink is perfect for a warm spring day, cleansing the palate between sweet bites.
-
Fruit Salad: A mix of seasonal fruits offers a juicy, bright contrast and a burst of freshness, complementing the cake without overpowering it.
-
Chocolate Ganache Tart: For dessert enthusiasts, a rich chocolate tart adds a deep, luxurious flavor that pairs delightfully with the lightness of the Easter Peep Cake.
-
Vanilla Ice Cream: A scoop of creamy vanilla ice cream provides a delightful contrast, softening each bite of that sweet cake.
Make Ahead Options
These delicious Easter Peep Cakes are perfect for meal prep and can save you valuable time during your festive celebrations! You can prepare the cake layers up to 24 hours in advance; simply bake and let them cool completely before wrapping each layer tightly in plastic wrap and refrigerating. The frosting can also be made ahead—store it in an airtight container in the refrigerator for up to 3 days. When it’s time to serve, just take the cake layers out, frost them, and apply your charming Bunny Peeps and decorations. This way, you’ll have a vibrant and whimsical Easter Peep Cake that’s just as delightful without any last-minute stress!
How to Store and Freeze Easter Peep Cake
Fridge: Store covered in the refrigerator for up to 3 days to maintain freshness. Keeping it covered will help to prevent the cake from drying out.
Freezer: If you need to freeze it, wrap the cake tightly in plastic wrap and aluminum foil. It can last in the freezer for up to 2 months.
Reheating: To serve, let the frozen Easter Peep Cake thaw in the fridge overnight. For added softness, consider microwaving a slice for 10-15 seconds before serving.
Decoration Tips: Add Bunny Peeps and coconut decorations just before serving for the best appearance and texture; this keeps everything looking fresh and fun!
Expert Tips for Easter Peep Cake
-
Room Temperature Ingredients: Ensure all your eggs and dairy are at room temperature for the best mixing results; this will create a fluffy and uniform batter.
-
Use Gel Food Coloring: Opt for gel food coloring instead of liquid for the most vibrant pastel shades without compromising the batter’s texture.
-
Chill Before Slicing: To achieve neat and clean cuts, chill the frosted Easter Peep Cake for about 20 minutes before serving. This helps the frosting to set slightly.
-
Add Peeps Last: To keep the Bunny Peeps fresh and chewy, place them on the cake just before serving; this prevents them from becoming stale.
-
Experiment with Flavors: Don’t hesitate to experiment with flavored frosting, such as lemon or almond, to add a unique twist to your Easter Peep Cake while keeping it delightful and celebratory!
Easter Peep Cake Variations
Feel free to let your creativity shine and customize this festive cake to make it uniquely yours!
-
Chocolate Bunny Swaps: Replace Bunny Peeps with chocolate bunnies for a delicious twist and a richer taste.
-
Cream Cheese Frosting: Substitute vanilla buttercream with cream cheese frosting for a tangy flavor that pairs beautifully with the cake.
-
Add Sprinkles: Layer colorful sprinkles between each cake layer to add an extra touch of fun and texture to your Easter Peep Cake.
-
Fruit Filling: Incorporate a layer of raspberry or strawberry jam between the cake layers for a fruity burst of flavor that nicely complements the sweetness.
-
Lighter Frosting: Use whipped topping or whipped cream for a lighter alternative to buttercream that keeps the cake airy and refreshing.
-
Gluten-Free Option: Swap out regular flour for a gluten-free blend to cater to those with dietary restrictions without sacrificing taste.
-
Pine Nuts for Crunch: Sprinkle toasted pine nuts on top for a delightful crunch that contrasts with the soft cake and frosting.
For even more sweetness and festive vibes, pair your Easter celebration with a luscious Cinnamon Roll Pancakes or a delightful slice of Strawberry Crunch Cheesecake.
Easter Peep Cake Recipe FAQs
What kind of butter should I use for the Easter Peep Cake?
I recommend using unsalted butter for a balanced flavor. It provides richness and moisture, which are essential for a delightful cake. If you’re looking for a dairy-free option, you can easily substitute it with margarine!
How should I store my leftover Easter Peep Cake?
To keep the Easter Peep Cake fresh, store it covered in the refrigerator for up to 3 days. Make sure it’s well-wrapped to prevent it from drying out. If decorated with Bunny Peeps, add those decorations just before serving for the best texture.
Can I freeze the Easter Peep Cake?
Absolutely! To freeze the cake, wrap it tightly in plastic wrap and then in aluminum foil. This will help preserve its moisture and flavor. It can be stored in the freezer for up to 2 months. When you’re ready to enjoy it, just thaw it in the fridge overnight, and consider microwaving a slice for about 10-15 seconds to bring back some of that fresh softness.
What should I do if my cake layers don’t rise properly?
If your cake layers don’t rise, it could be due to expired baking powder or baking soda. Always check the expiration dates when baking! Ensure your ingredients are at room temperature before mixing, and carefully follow the instructions for alternate wet and dry ingredients to create a light, fluffy cake.
Are there any dietary considerations for the Easter Peep Cake?
Yes! If you need a dairy-free option, use margarine instead of butter and a dairy-free milk in the recipe. For a vegan twist, consider substituting the eggs with a vegan egg replacer (like flaxseed meal) and using a vegan cream for the frosting. Always check the candy and decorating ingredients for any allergens, especially if serving to those with dietary restrictions.
Can the Easter Peep Cake be made in advance?
Yes! You can bake the layers a day ahead. Once cooled, wrap each layer tightly in plastic wrap and keep them stored in the refrigerator. Just frost and decorate before the event to keep everything looking fresh and lively. This approach makes it easy to enjoy your celebrations without last-minute baking stress!
Easter Peep Cake: A Colorful Delight for Your Spring Celebrations
Ingredients
Equipment
Method
- Prep Oven & Pans: Preheat your oven to 350°F (180°C). Grease and flour three 9-inch round cake pans, and line the bottoms with parchment paper.
- Make Batter: Cream together 1 cup of softened unsalted butter and 2 cups of granulated sugar until light and fluffy, about 3-5 minutes. Add 3 room-temperature eggs, one at a time, ensuring each is fully incorporated. Mix in 2 teaspoons of vanilla extract.
- Combine Dry Ingredients: In another bowl, whisk together 3 cups of all-purpose flour, 2 teaspoons of baking powder, 1 teaspoon of baking soda, and ½ teaspoon of salt.
- Mix Wet & Dry Ingredients: Gradually add dry ingredients to the creamed mixture, alternating with 1 cup of buttermilk or whole milk.
- Color the Batter: Divide the batter into three bowls and tint one pink, another yellow, and the last blue using gel food coloring.
- Bake Layers: Pour each colored batter into prepared pans and bake for 20-25 minutes. Let layers cool in the pans for 10 minutes, then transfer to wire racks.
- Prepare Frosting: Beat 2 cups of softened unsalted butter until creamy. Gradually add 8 cups of powdered sugar, mix in 1 tablespoon vanilla extract, ½ teaspoon salt, and ⅓ cup heavy cream.
- Assemble Cake: Place the blue layer on a serving plate, spread frosting, add the yellow layer, then repeat with the pink layer.
- Crumb Coat: Apply a thin layer of frosting around the entire cake to seal in crumbs and refrigerate for about 15 minutes.
- Final Frosting: Spread a thicker layer of frosting over the entire cake smoothly.
- Decorate: Press Bunny Peeps around the edges, fill the top and gaps with dyed green coconut flakes and scattered M&M's.
Leave a Reply