
Have you ever found yourself standing in front of the pantry, scanning for a healthy snack that isn’t just another boring granola bar or a sugary treat? Well, say goodbye to those days! These Protein-Packed No-Bake Chickpea and Date Snack Bars might just become your new go-to solution. With a delightful combination of creamy nut butter and naturally sweet dates, they not only provide a satisfying bite but are also gluten-free and vegan-friendly. The best part? They’re super quick to prepare, needing no oven time, which means you can whip them up even on the busiest of days. Perfect for post-workout recovery or an afternoon pick-me-up, these bars will redefine your snacking routine. Curious to see how easy they are to make? Let’s dive in!
Why Choose These Chickpea and Date Snack Bars?
Healthy, Guilt-Free Snacking: With wholesome ingredients like chickpeas and dates, these bars provide a nutritious energy boost without the added sugars found in many store-bought snacks.
Quick and No-Bake: Perfect for busy lifestyles—these bars come together in a matter of minutes without any cooking!
Customizable Delight: Add your favorite mix-ins, like dark chocolate chips or dried fruits, to tailor the taste just for you.
Friendly for All Diets: Vegan and gluten-free, they cater to a wide range of dietary needs, making them an excellent choice for everyone.
Great for Any Occasion: Pack them for on-the-go snacking, post-workout refuels, or a tasty dessert option for gatherings. Say goodbye to boredom—tempting treats are just a quick blend away!
Chickpea and Date Snack Bars Ingredients
For the Base
- Cooked Chickpeas – Provides a rich source of plant-based protein; for convenience, use canned chickpeas and rinse well to remove excess sodium.
- Pitted Dates – Adds natural sweetness and a chewy texture; soak in warm water if dry for smoother blending.
- Oats – Contributes structure and fiber to the bars; opt for certified gluten-free oats for a gluten-free option.
For Flavor & Sweetness
- Nut Butter (e.g., Peanut/Almond Butter) – Enhances flavor and creaminess; substitute with sunflower seed butter for a nut-free option.
- Honey/Maple Syrup – Acts as a natural sweetener; for a vegan-friendly option, agave syrup works beautifully.
- Vanilla Extract – Adds depth of flavor; almond extract can be used for a different twist.
- Cinnamon – Provides optional mild warmth and flavor enhancement.
- Salt – Balances sweetness; adjust to taste for a perfect flavor profile.
Optional Additions
- Dark Chocolate Chips – Offers indulgent flavor; omit for lower sugar or replace with carob chips for a unique touch.
Step‑by‑Step Instructions for Chickpea and Date Snack Bars
Step 1: Blend Base Ingredients
In a food processor, combine 1 cup of cooked chickpeas and 1 cup of pitted dates. Pulse until the mixture is smooth and creamy; this should take about 1-2 minutes. Stop occasionally to scrape down the sides with a spatula to ensure an even blend. The end result should be a rich, sticky paste that forms when pressed together.
Step 2: Combine Additional Ingredients
Next, add in 1 cup of oats, 1/2 cup of nut butter, 1/4 cup of honey or maple syrup, 1 teaspoon of vanilla extract, a pinch of cinnamon, and a dash of salt. Blend everything together for another 1-2 minutes, until the ingredients are thoroughly combined and form a thick, cohesive mixture. The Chickpea and Date Snack Bars’ base should be pliable but firm enough to hold shape when pressed.
Step 3: Add Chocolate Chips
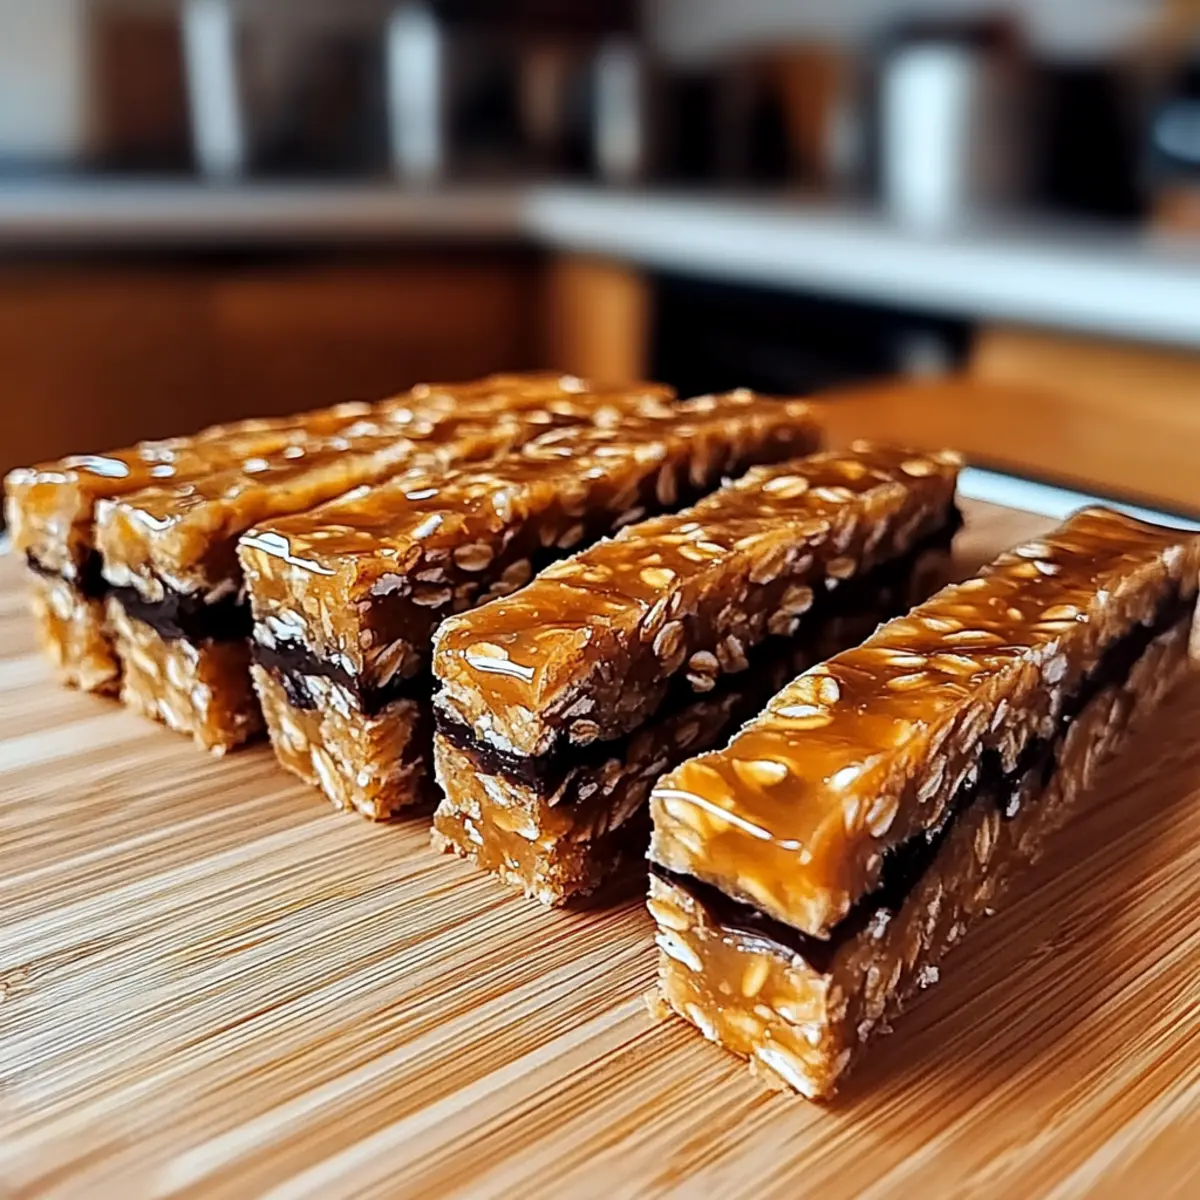
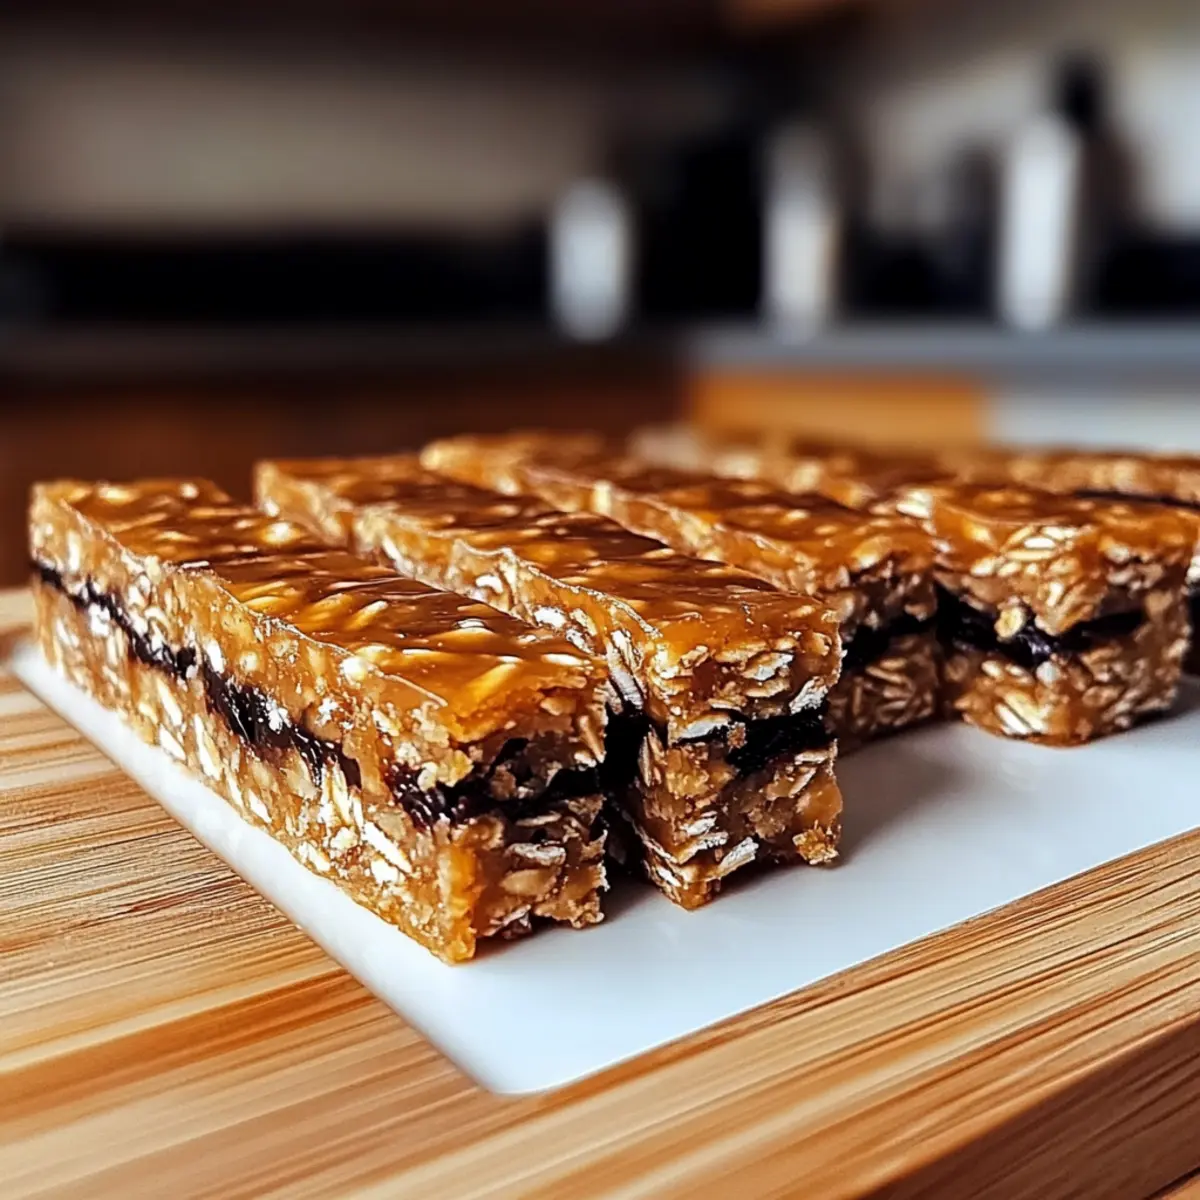
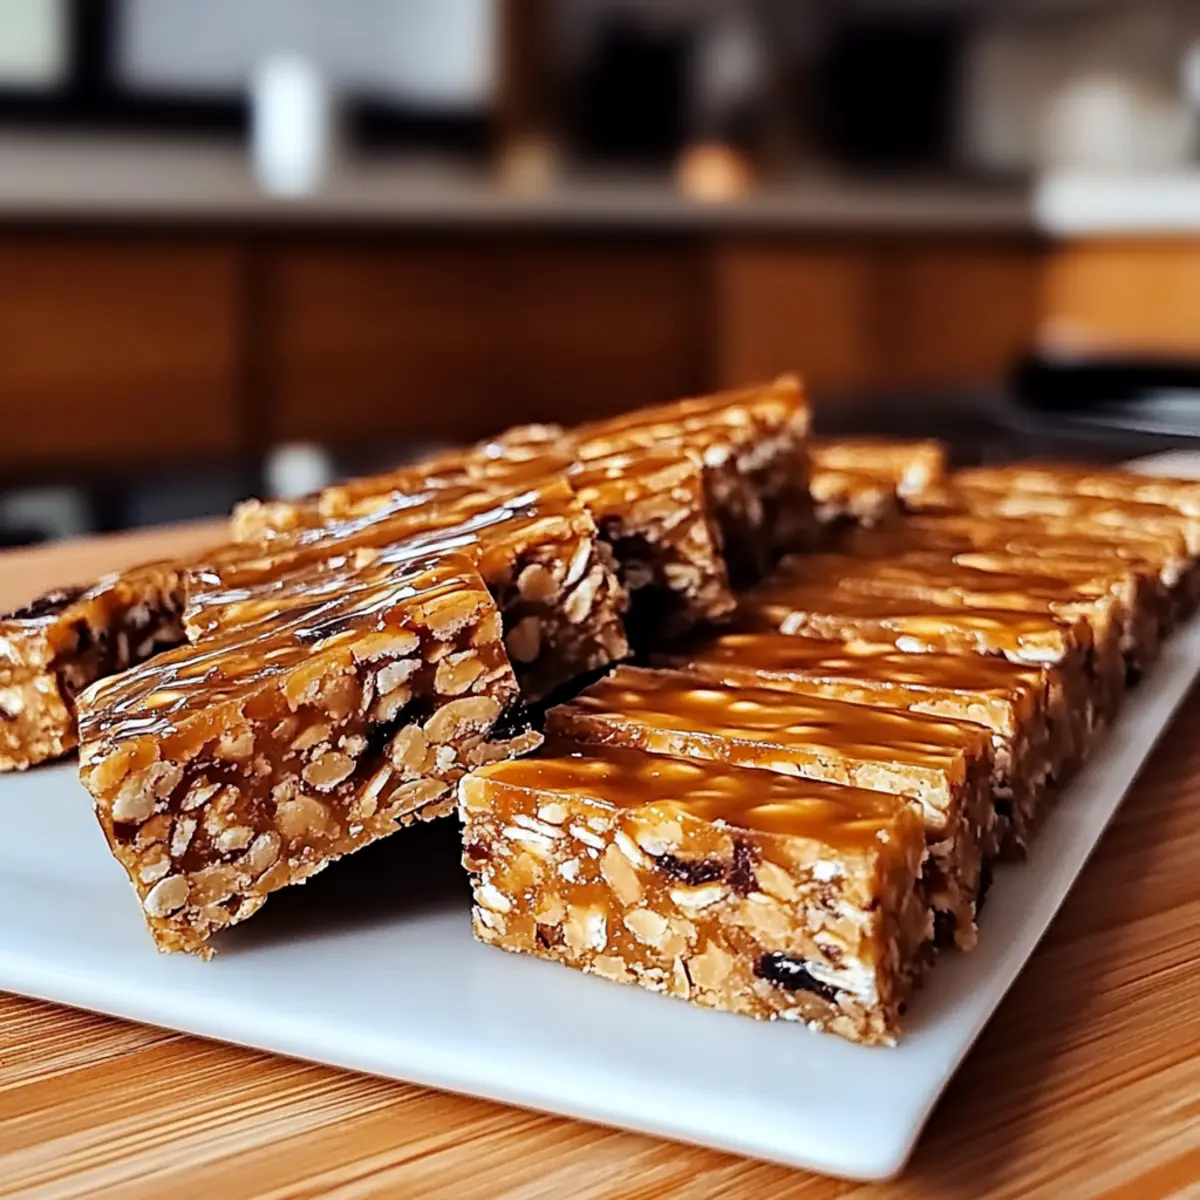
If you’d like to enhance your Chickpea and Date Snack Bars with a sweet touch, gently fold in 1/3 cup of dark chocolate chips using a spatula. Be careful not to overmix; you want the chips distributed throughout your mixture without breaking them down. This step adds a delightful finish that complements the earthy flavors of the chickpeas and dates.
Step 4: Prepare Baking Dish
Line an 8×8-inch baking dish with parchment paper, allowing some overhang for easy removal later. This step is crucial for ensuring that the bars come out intact. Smooth the parchment paper across the bottom and up the sides of the dish, creating a neat base for your mixture.
Step 5: Spread Mixture
Transfer the mixture into the prepared baking dish, using a spatula to evenly distribute it. Press down firmly to compact the mixture into the dish, creating an even layer. Make sure all corners are filled, as this will help the Chickpea and Date Snack Bars hold their shape when cut. A smooth, even surface is key for a consistent texture.
Step 6: Chill
Place the dish in the refrigerator and let the mixture chill for at least 1 hour. This step is vital as it allows the bars to set properly, making them easier to slice later. After about 30 minutes, check for firmness; they should feel solid but slightly yielding when pressed.
Step 7: Slice and Serve
Once the Chickpea and Date Snack Bars are set, use the parchment overhang to lift them out of the dish. Place them on a cutting board and use a sharp knife to slice into squares or rectangles. Enjoy these nutritious bars as a quick snack or energy boost throughout your day!
Storage Tips for Chickpea and Date Snack Bars
Fridge: Store your Chickpea and Date Snack Bars in an airtight container in the refrigerator for up to one week. This keeps them fresh and ready for snacking!
Freezer: If you want to enjoy these bars later, wrap them individually in plastic wrap and place them in a freezer-safe bag. They will stay delicious for up to three months.
Thawing: To enjoy frozen bars, simply take them out of the freezer and let them thaw in the fridge overnight or at room temperature for about an hour before enjoying.
Reheating: These bars are best enjoyed cold or at room temperature, but you can warm them slightly in the microwave for a cozy treat if desired.
Chickpea and Date Snack Bars Variations
Feel free to get creative with these Chickpea and Date Snack Bars, making them your own delicious masterpiece!
- Nut-Free Swap: Replace nut butter with sunflower seed butter for a nut-free treat that still delivers creamy goodness.
- Gluten-Free Twist: Use certified gluten-free oats to create a snack that fits perfectly into a gluten-free lifestyle without sacrificing flavor.
- Sweet & Tangy: Substitute some of the dates with dried apricots or cranberries for a fruity burst of flavor to complement the sweetness.
- Extra Crunch: Toss in pumpkin seeds or chopped walnuts for a delightful crunch that contrasts with the chewy texture.
- Chocolate Lovers Delight: Go all out by adding chopped dark chocolate or cacao nibs, taking your bars to a richer chocolatey realm.
- Protein Boost: Stir in a scoop of your favorite protein powder while blending for an extra muscle-supporting boost, making them perfect for post-workout recovery.
- Spicy Kick: Add a dash of cayenne pepper or crushed red pepper flakes for a surprising hint of warmth, perfectly balancing the sweetness of the dates.
- Flavorful Extracts: Exchange vanilla extract for almond extract or even coconut extract to shift the flavor palette and create an interesting twist.
Don’t forget, you can enjoy these bars alongside a luscious yogurt dip or even serve with fresh berries for an elevated snack experience. And if you’re interested in experimenting even more, check out my delicious Chip Toffee Shortbread or these rich Cream Cheese Bars!
Make Ahead Options
These Protein-Packed Chickpea and Date Snack Bars are perfect for meal prep, letting you save time for your busy week ahead! You can blend the base ingredients (chickpeas, dates, oats, nut butter, and sweeteners) up to 24 hours in advance, storing the mixture in an airtight container in the refrigerator. For optimal quality, ensure the mixture is well-combined to maintain its texture when pressed into the baking dish. After chilling for at least 1 hour to set, simply slice and serve when you’re ready for snacking. These bars are just as delicious, even when made ahead, ensuring you have a nourishing bite ready whenever cravings strike!
Expert Tips for Chickpea and Date Snack Bars
-
Smooth Blending: Ensure chickpeas and dates are well-blended before adding other ingredients; this creates a smooth texture for your Chickpea and Date Snack Bars.
-
Adjust Consistency: If your mixture feels too wet, add a little extra oats; if too dry, a splash of water can help bind everything together more effectively.
-
Chill Time Matters: Do not skip the chilling step; it’s essential for achieving the right texture. Allowing the bars to set properly makes for easier slicing.
-
Parchment Paper Prep: Use enough parchment paper to hang over the edges of your baking dish; this will make removing the bars easier and help maintain their shape.
-
Mix-In Freedom: Feel free to customize these bars with add-ins like chia seeds or dried fruits. Just remember to balance the moisture to keep your Chickpea and Date Snack Bars stable.
What to Serve with Protein-Packed Chickpea and Date Snack Bars?
Elevate your snacking experience with these delightful pairings that complement the nutty and sweet flavors of these bars.
-
Greek Yogurt: Creamy and tangy, Greek yogurt adds a luscious texture and protein boost, perfect for dipping or spreading.
-
Fresh Berries: Juicy and tart, berries like strawberries or blueberries provide a refreshing contrast to the sweetness of the bars while adding vibrant color.
-
Nut Butter Drizzle: A sprinkle of your favorite nut butter over the bars enhances the flavor richness and provides an extra protein kick.
-
Chia Seed Pudding: Soft and subtly sweet, a bowl of chia pudding pairs wonderfully, offering a delightful contrast in texture and a nutrient-packed option.
-
Herbal Tea: Brew a cup of calming herbal tea to sip alongside your bars, creating a comforting and healthful afternoon treat.
-
Dark Chocolate Squares: A few squares of high-quality dark chocolate provide an indulgent element that perfectly complements the bars’ sweetness, making for a satisfying dessert experience.

Chickpea and Date Snack Bars Recipe FAQs
What type of chickpeas should I use?
Absolutely! You can use either cooked chickpeas or canned chickpeas for this recipe. If using canned, be sure to rinse them thoroughly to remove excess sodium, which can enhance the flavor of your bars.
How should I store the Chickpea and Date Snack Bars?
Store your Chickpea and Date Snack Bars in an airtight container in the refrigerator for up to 1 week. For longer storage, freeze them individually wrapped in plastic wrap and place them in a freezer-safe bag; they can last up to 3 months. Just remember to let them thaw at room temperature or in the fridge before enjoying!
Can I freeze these snack bars?
Yes, you can! To freeze, wrap each bar in plastic wrap or place them in a single layer in a freezer-safe container. They’ll stay delicious for up to 3 months. When you’re ready to enjoy, simply take them out and let them thaw in the fridge overnight or at room temperature for about an hour.
What if the mixture is too dry or too wet?
No worries! If your mixture feels too dry, you can gently add a tablespoon of water, which should help bind everything together. Conversely, if it’s too wet, simply incorporate a little more oats until you achieve a thick, moldable consistency. A perfect balance will ensure a great texture for your bars.
Are these snack bars safe for people with nut allergies?
Very! If you’re catering to nut allergies, just substitute the nut butter with sunflower seed butter in your Chickpea and Date Snack Bars. This option gives you that creamy texture and flavor without the nuts, making them safe for everyone to enjoy. Always double-check any additional ingredients for potential allergens.
Can I add protein powder to boost nutritional content?
Certainly! If you’re looking to enhance the protein content in your Chickpea and Date Snack Bars, feel free to mix in a scoop of your favorite protein powder while combining the ingredients. Just keep an eye on the texture and adjust with a bit of extra nut butter or oats as needed to keep them cohesive.
Chickpea and Date Snack Bars: Healthy No-Bake Delights
Ingredients
Equipment
Method
- In a food processor, combine 1 cup of cooked chickpeas and 1 cup of pitted dates. Pulse until the mixture is smooth and creamy; about 1-2 minutes.
- Add in 1 cup of oats, 1/2 cup of nut butter, 1/4 cup of honey or maple syrup, 1 teaspoon of vanilla extract, a pinch of cinnamon, and a dash of salt. Blend until thoroughly combined.
- Gently fold in 1/3 cup of dark chocolate chips using a spatula without overmixing.
- Line an 8x8-inch baking dish with parchment paper, allowing overhang for easy removal.
- Transfer the mixture into the prepared baking dish, using a spatula to evenly distribute it and press down firmly.
- Place the dish in the refrigerator and let the mixture chill for at least 1 hour to set.
- Once set, lift out using parchment overhang, slice into squares or rectangles, and serve.
Leave a Reply