
As I walked through the vibrant local market, the scent of ripe oranges beckoned me. That day sparked the inspiration for my Classic Orange Tart—a dessert that marries elegance with ease. With a tender, flaky crust cradling a silky orange curd, this delightful tart not only impresses guests but also fits effortlessly into your busy schedule. Whether it’s a spontaneous gathering or a formal dinner, this easy-to-make recipe ensures you have a stunning centerpiece without the stress—perfect for make-ahead convenience. Are you ready to bring a slice of sunshine to your table? Let’s dive into this citrus wonder!

Why is This Orange Tart Irresistible?
Elegant Presentation: This Classic Orange Tart not only tastes divine but looks beautiful, making it perfect for any occasion. Simplicity at Its Best: Easy to make with straightforward steps, even novice bakers can achieve stunning results. Make-Ahead Marvel: Prep the crust and curd up to two days in advance, saving you time without sacrificing flavor. Versatile Options: Experiment with different citrus fruits or add toppings like fresh berries for a unique twist. Serve it chilled with a dollop of whipped cream or alongside a warm cup of coffee for the ultimate experience! Consider pairing it with a delightful Pesto Caprese Sandwich for a refreshing meal!
Classic Orange Tart Ingredients
For the Crust
• Flour – Essential for structure; use all-purpose flour for the best results.
• Powdered Sugar – Sweetens the crust; can be substituted with granulated sugar for a different texture.
• Almond Flour – Adds nutty flavor; optional for a gluten-free crust.
• Butter – Provides richness and flakiness; opt for unsalted for better control over salt levels.
• Egg Yolk – Binds the crust and adds richness; a flax egg can be used as a vegan alternative.
For the Orange Curd Filling
• Oranges – Fresh juice is crucial for flavor; Navel or Valencia oranges are ideal.
• Cornstarch – Thickens the filling for a silky texture; can swap with arrowroot if needed.
• Superfine Sugar – Sweetens the curd; regular granulated sugar works in equal amounts.
• Gelatin – Ensures the curd sets properly; use agar-agar for a vegetarian option.
For Whipped Cream Topping
• Heavy Cream – Whipped to perfection for a rich texture; substitute coconut cream for a non-dairy twist.
• Optional Bitters – Enhances the whipped cream’s flavor; can be omitted for simplicity.
Dive into creating this elegant and delicious Classic Orange Tart that’s sure to impress!
Step‑by‑Step Instructions for Classic Orange Tart
Step 1: Prepare the Crust
In a food processor, combine flour, powdered sugar, almond flour, a pinch of salt, and the zest of one orange. Pulse the mixture until it resembles coarse breadcrumbs. Next, add chilled, cubed butter and pulse again until mixed. Incorporate the egg yolk and a few tablespoons of cold water, blending until a dough forms. Wrap the dough in plastic wrap and refrigerate for at least 15 minutes to firm up.
Step 2: Blind Bake the Tart Shell
Grease a 9-inch tart pan and roll the dough into the pan, trimming any excess. Prick the base with a fork to prevent bubbling, then chill the crust for 30 minutes. Preheat your oven to 200°C (390°F). Line the chilled tart shell with foil, fill with pie weights or dried beans, and bake for 12-15 minutes. Remove the weights and foil, trim the edges if necessary, and bake for another 10-12 minutes until the crust is golden.
Step 3: Make the Orange Curd Filling
In a medium saucepan, heat the juice of about four oranges over medium heat until steaming, being careful not to boil. In a separate bowl, whisk together eggs, superfine sugar, and cornstarch until smooth. Slowly add the hot orange juice to the egg mixture, whisking constantly to avoid cooking the eggs. Transfer back to the saucepan and stir over low heat for about 5-7 minutes until thickened.
Step 4: Incorporate Gelatin and Butter
Once thickened, remove the orange curd mixture from the heat and stir in gelatin until fully dissolved. Allow the mixture to cool slightly before incorporating a few tablespoons of butter and a bit of orange zest, stirring until smooth and glossy. The Classic Orange Tart filling should have a velvety texture at this point.
Step 5: Assemble the Tart
Pour the cooled orange curd into the prepared tart shell, smoothing the top with a spatula. Refrigerate the tart for at least 3 hours or overnight to set properly, as the flavors develop and the filling firms up perfectly, creating that delightful texture.
Step 6: Prepare Whipped Cream
When you’re ready to serve, whip the heavy cream in a bowl until soft peaks form. Gradually add sugar and optional bitters, folding them in gently until combined. This whipped cream will top off your Classic Orange Tart beautifully, adding a rich finish that complements the citrusy filling.
Step 7: Garnish and Serve
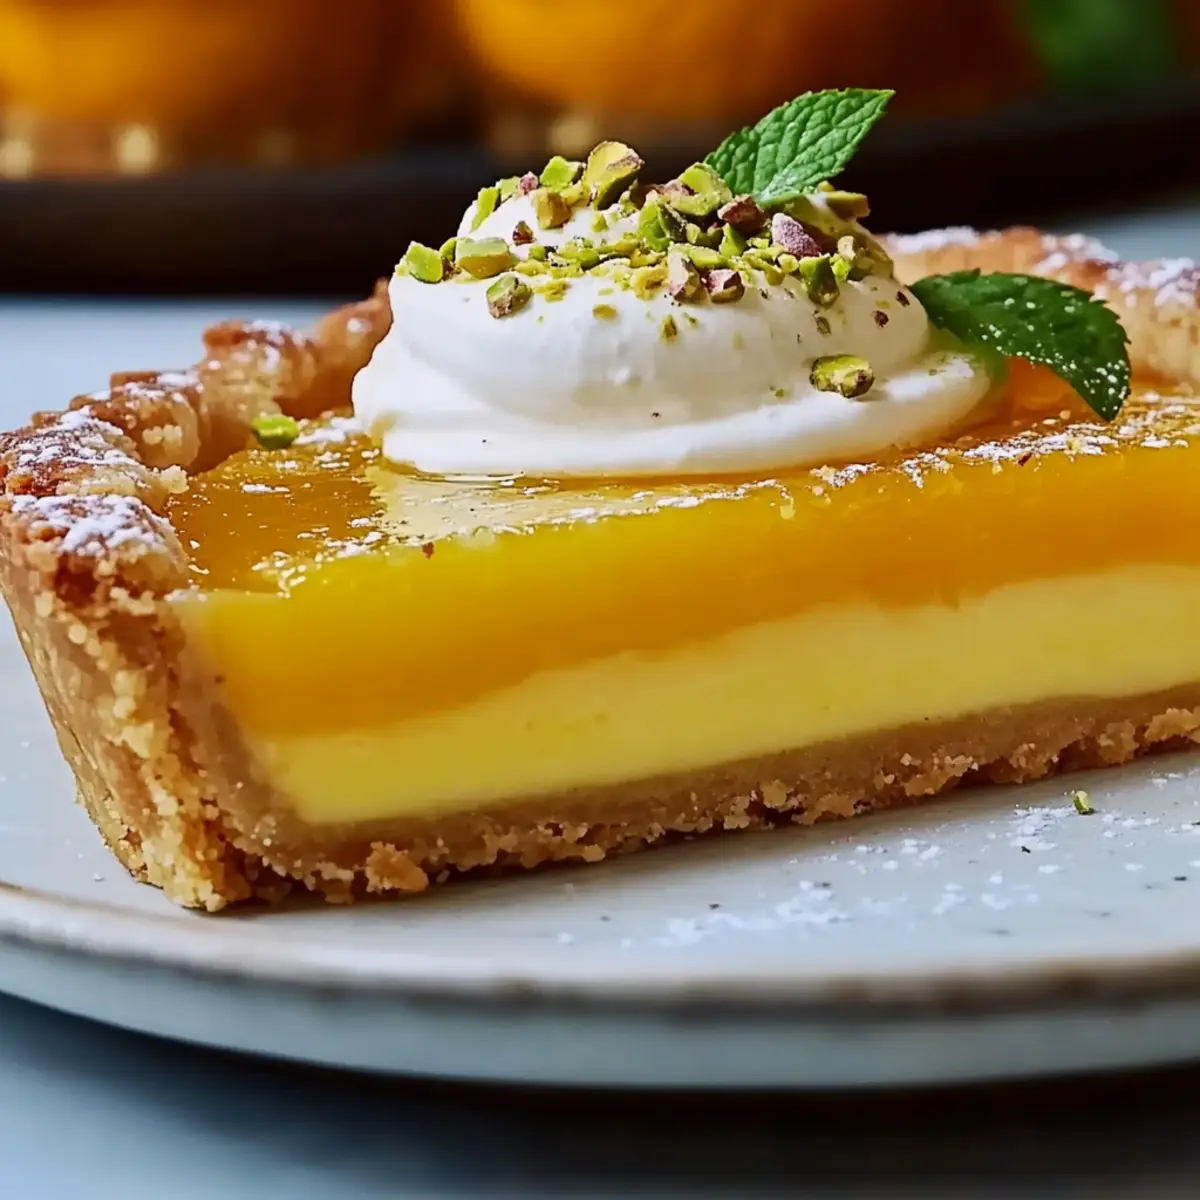
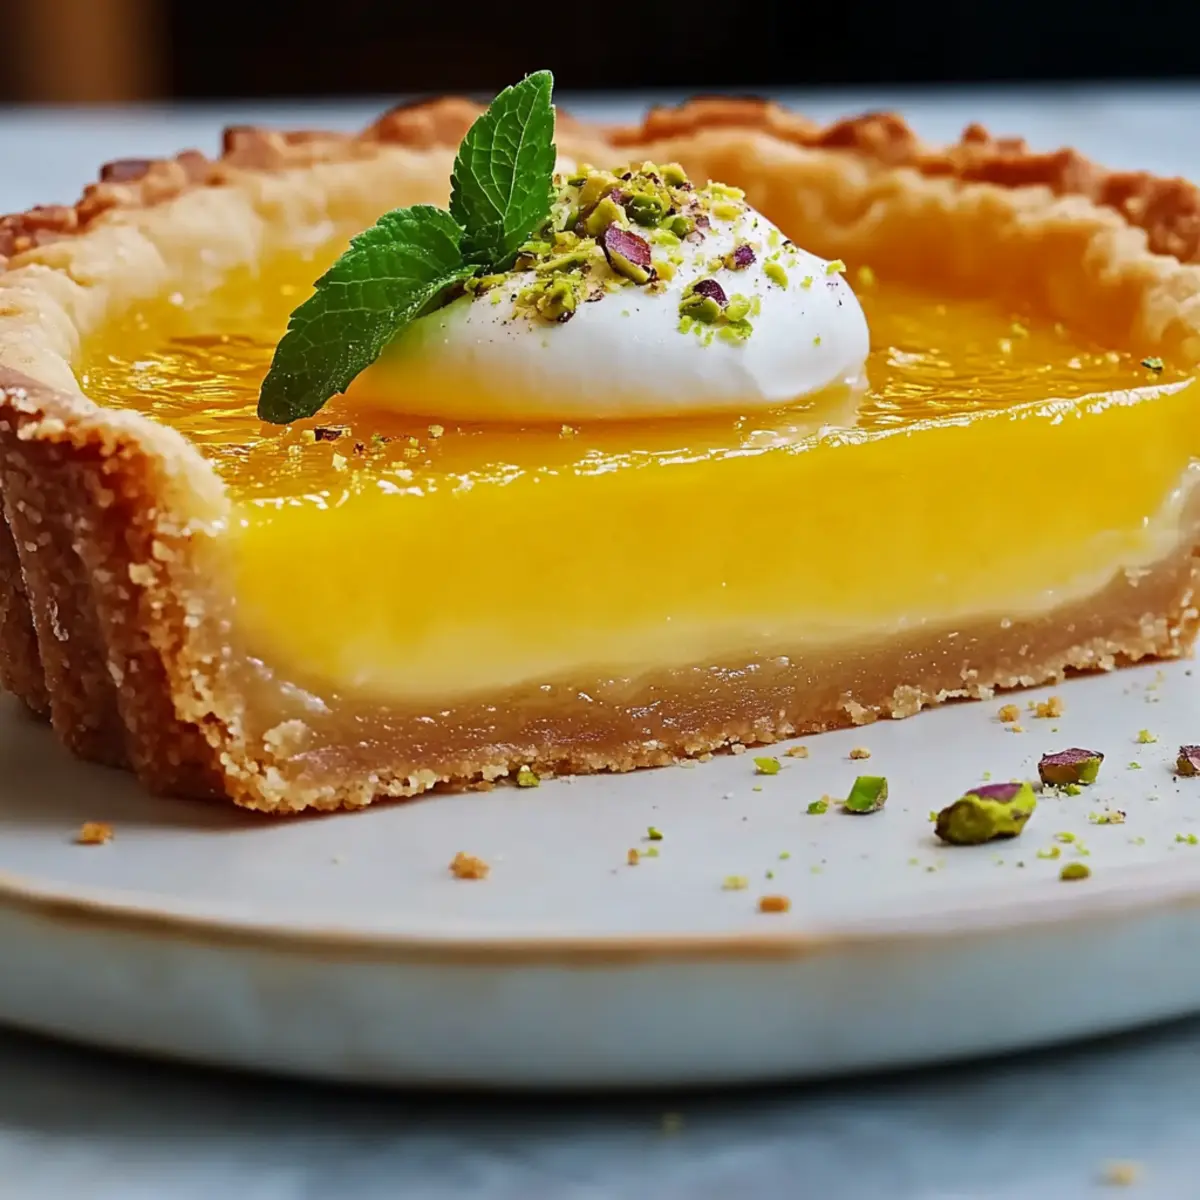
Before serving, garnish the tart with dollops of the prepared whipped cream, along with crushed pistachios and a sprig of fresh mint for an elegant touch. Slice into the tart with a warm knife for clean cuts, and enjoy the refreshing flavors of your homemade Classic Orange Tart!
Classic Orange Tart Variations & Substitutions
Customize this delightful Classic Orange Tart to suit your taste buds and dietary preferences for a truly personal creation.
-
Citrus Twist: Use fresh lemon or lime juice for a zesty variation that brings a refreshing zing to the tart.
-
Gluten-Free Crust: Substitute all-purpose flour with a gluten-free blend or almond flour for a delightful, nutty flavor that everyone can enjoy.
-
Creamy Coconut: Replace heavy cream with coconut cream for a tropical twist that adds richness and a hint of exotic flavor.
-
Berry Delight: Layer fresh berries like raspberries or blueberries on top of the curd before chilling to add color and natural sweetness to each slice.
-
Chocolate Drizzle: Drizzle melted dark chocolate over the tart before serving for a luxurious touch that perfectly balances the citrus notes.
-
Flax Egg Substitute: If you need a vegan option, use a flax egg by mixing one tablespoon of ground flaxseed with three tablespoons of water for the crust binding.
-
Fruity Infusion: Incorporate a splash of blood orange juice into the filling for a stunning color and unique taste experience.
-
Herbal Infusion: Add a few torn fresh mint or basil leaves into the orange curd filling for an aromatic twist that brightens the flavor profile beautifully.
And if you crave a savory bite alongside dessert, consider preparing a lovely Pesto Caprese Sandwich as an appetizer! This delightful pairing will surely enhance your gathering and offer a refreshing meal experience.
What to Serve with Classic Orange Tart
Elevate your dessert experience with delightful pairings that enhance the refreshing flavors of this elegant tart.
-
Creamy Mashed Potatoes: These buttery potatoes provide a rich texture that balances the tart’s citrus brightness, making each bite a comforting delight.
-
Vanilla Ice Cream: The creamy sweetness of vanilla ice cream complements the bright orange filling, creating a harmonious and refreshing indulgence.
-
Fresh Berries Salad: A medley of strawberries, blueberries, and raspberries brings a burst of color and fresh acidity that pairs beautifully with the tart.
-
Sparkling Wine: A crisp and bubbly sparkling wine enhances the tart’s flavors, making every bite feel like a special occasion.
-
Herb-Infused Tea: A warm cup of herbal tea with citrus notes creates a soothing backdrop that accentuates the orange flavors in the tart.
-
Chocolate Ganache Drizzle: A rich chocolate sauce drizzled over the tart adds a decadent layer of flavor, offering a delightful contrast to its light and zesty profile.
-
Coconut Sorbet: This light and refreshing sorbet serves as a cooling palate cleanser, enhancing the tart’s bright flavors.
-
Roasted Almonds: Crunchy, caramelized almonds offer a satisfying texture contrast, while their nuttiness complements the almond flour in the tart crust.
-
Chilled Green Tea: The subtle bitterness of chilled green tea acts as a perfect counterpoint to the sweetness, refreshing your palate for another bite.
-
Lemon Basil Meringue Cookies: These airy and tangy cookies provide a unique twist, echoing the citrus notes while adding a delightful crunch to your dessert spread.
Make Ahead Options
These Classic Orange Tart preparations are a lifesaver for busy cooks! You can prepare the tart crust and orange curd filling up to 2 days in advance, ensuring that you have everything ready when it’s time to serve. To maintain the best quality, wrap the crust tightly in plastic wrap after chilling, and store the orange curd in an airtight container in the refrigerator. When you’re ready to assemble, simply pour the cooled curd into the baked tart shell and refrigerate for at least 3 hours or overnight until fully set. Finish the tart with whipped cream and garnishes just before serving, guaranteeing a fresh and delightful dessert experience!
Expert Tips for Classic Orange Tart
-
Pastry Perfection: Avoid overworking the dough, as too much handling can result in a tough crust. Keep it light and quick.
-
Blind Baking: To prevent a soggy bottom, make sure to blind bake the tart shell thoroughly, using weights to keep it flat.
-
Control the Heat: When making the curd, stir gently over medium-low heat to prevent the eggs from scrambling. Patience is key here.
-
Chill Time: Allow the tart to chill for at least 3 hours after assembly to ensure the filling is firm and slices cleanly.
-
Clean Slices: For perfect slices, dip your knife in warm water before cutting through the Classic Orange Tart. This helps achieve those beautiful, smooth edges!
How to Store and Freeze Classic Orange Tart
Refrigerator: Store your Classic Orange Tart in the fridge for up to 3 days in an airtight container. This allows the flavors to develop, making it even more delicious!
Freezer: If you need to freeze it, wrap individual slices in plastic wrap and then place them in a freezer-safe bag. The tart can be frozen for up to 2 months.
Thawing: When ready to enjoy, transfer the slices to the fridge overnight to thaw slowly. For best texture, enjoy chilled.
Reheating: If you prefer it slightly warmed, gently warm the tart in the oven at a low temperature (about 150°F) while covering it with foil to avoid drying out.
Classic Orange Tart Recipe FAQs
What kind of oranges should I use for the Classic Orange Tart?
I recommend using juicy Navel or Valencia oranges for the best flavor and sweetness in the curd filling. Look for oranges that feel heavy for their size and have a smooth, firm skin without dark spots or blemishes.
How should I store the Classic Orange Tart, and how long does it last?
Store your Classic Orange Tart in the refrigerator for up to 3 days in an airtight container. The flavors actually improve overnight, making it an excellent make-ahead dessert for gatherings!
Can I freeze the Classic Orange Tart?
Absolutely! To freeze, wrap individual slices in plastic wrap and place them inside a freezer-safe bag. This allows the tart to be preserved for up to 2 months. When you’re ready to enjoy, simply thaw the slices overnight in the fridge for the best texture.
What should I do if my crust becomes tough?
If you find your tart crust is tough, it could be due to overworking the dough. I recommend mixing the ingredients just until combined and avoiding handling it more than necessary. Also, ensure that you refrigerate the dough before rolling it out to maintain a flaky texture.
Are there any dietary considerations for the Classic Orange Tart?
For those with dietary restrictions, this tart can be adapted. Use a flax egg instead of a traditional egg yolk for a vegan option, and substitute gelatin with agar-agar for a vegetarian-friendly version. Additionally, to make it gluten-free, use almond flour exclusively for the crust.
How can I achieve the perfect set for my orange curd?
To get that smooth and silky orange curd, be sure to cook it over medium-low heat, stirring constantly. If you notice it begins to thicken too quickly, remove it from the heat and continue stirring. Once you achieve the desired thickness, mix in the gelatin slowly until completely dissolved, then fold in the butter and zest. This step is crucial for a delicious and stable filling!

Classic Orange Tart: A Simple Yet Elegant Citrus Delight
Ingredients
Equipment
Method
- In a food processor, combine flour, powdered sugar, almond flour, a pinch of salt, and the zest of one orange. Pulse until it resembles coarse breadcrumbs.
- Add chilled, cubed butter and pulse until mixed. Incorporate the egg yolk and a few tablespoons of cold water, blending until a dough forms.
- Wrap the dough in plastic wrap and refrigerate for at least 15 minutes to firm up.
- Grease a 9-inch tart pan and roll the dough into the pan, trimming any excess. Prick the base with a fork and chill for 30 minutes.
- Preheat the oven to 200°C (390°F). Line the tart shell with foil, fill with weights, and bake for 12-15 minutes.
- Remove the weights and foil, trim the edges if necessary, and bake for another 10-12 minutes until golden.
- In a saucepan, heat the juice of about four oranges over medium heat until steaming.
- In a bowl, whisk together eggs, superfine sugar, and cornstarch until smooth. Slowly add the hot orange juice, whisking constantly.
- Transfer back to the saucepan and stir over low heat for about 5-7 minutes until thickened.
- Remove from heat and stir in gelatin until fully dissolved. Allow to cool slightly before incorporating butter and orange zest.
- Pour the cooled orange curd into the prepared tart shell, smoothing the top. Refrigerate for at least 3 hours to set.
- Whip heavy cream until soft peaks form, gradually adding sugar and bitters until combined.
- Garnish with whipped cream, crushed pistachios, and mint before serving.
Leave a Reply